A tutorial to host your Static Site on Netlify
Discover Netlify, a great hosting service ideal for static sites which has a nice free plan, free CDN and it's blazing fast
I host my blog on Netlify.
I moved a while ago, my previous hosting was having some issues that made my site unreachable for a few hours, and while I waited for it to get up online again, I searched around for a quick way to bring it back and I created a replica of my site on Netlify.
Since this blog runs on Hugo, which is a Static Site Generator, I don’t need a lot of work to move the blog to a new hosting. All I need is something that can serve HTML files, which is pretty much any hosting on the planet.
I started looking for the best platform for a static site, and a few stood out but I eventually tried Netlify, and I’m glad I did.

Introducing Netlify
There are a few things that made a great impression to me before trying it.
First, the free plan is very generous for free or commercial projects, with 100GB of free monthly bandwidth, and for a static site with just a few images here and there, it’s a lot of space!
They include a global CDN, to make sure speed is not a concern even in continents far away from the central location servers.
You can point your DNS nameservers to Netlify and they will handle everything for you with a very nice interface to set up advanced needs.
They of course support having a custom domain and HTTPS.
Coming from Firebase, I expected a very programmer friendly way to manage deploys, but I found it even better with regards to handling each Static Site Generator.
Netlify and Hugo
I use Hugo, and locally I run a server by using its built-in tool hugo server, which handles rebuilding all the HTML every time I make a change, and it runs an HTTP server on port 1313 by default.
To generate the static site, I have to run hugo, and this creates a series of files in the public/ folder.
I followed this method on Firebase: I ran hugo to create the files, then firebase deploy, configured to push my public/ folder content to the Google servers.
In the case of Netlify however, I linked it to my private GitHub repository that hosts the site, and every time I push to the master branch, the one I told Netlify to sync with, Netlify initiates a new deploy, and the changes are live within seconds.

TIP: if you use Hugo on Netlify, make sure you set HUGO_VERSION in
netlify.tomlto the latest Hugo stable release, as the default version might be old and (at the time of writing) does not support recent features like post bundles. Here’s my netlify.toml configuration file.
If you think this is nothing new, you’re right, since this is not hard to implement on your own server (I do so on other sites not hosted on Netlify), but here’s something new: you can preview any GitHub (or GitLab, or BitBucket) branch / PR on a separate URL, all while your main site is live and running with the “stable” content.
Another cool feature is the ability to perform A/B testing on 2 different Git branches.
Advanced functionality offered by Netlify for Static Sites
Static sites have the obvious limitation of not being able to do any server-side operation, like the ones you’d expect from a traditional CMS for example.
This is an advantage (less security issues to care about) but also a limitation in the functionality you can implement.
A blog is nothing complex, maybe you want to add comments and they can be done using services like Disqus or others.
Or maybe you want to add a form and you do so by embedding forms generated on 3rd party applications, like Wufoo or Google Forms.
Netlify provides a suite of tools to handle Forms, authenticate users and even deploy and manage Lambda functions.
Need to password protect a site before launching it? ✅
Need to handle CORS? ✅
Need to have 301 redirects? ✅
Need pre-rendering for your SPA? ✅
I just scratched the surface of the things you can do with Netlify without reaching out to 3rd party services, and I hope I gave you a reason to try it out.
Previewing branches
The GitHub integration works great with Pull Requests.
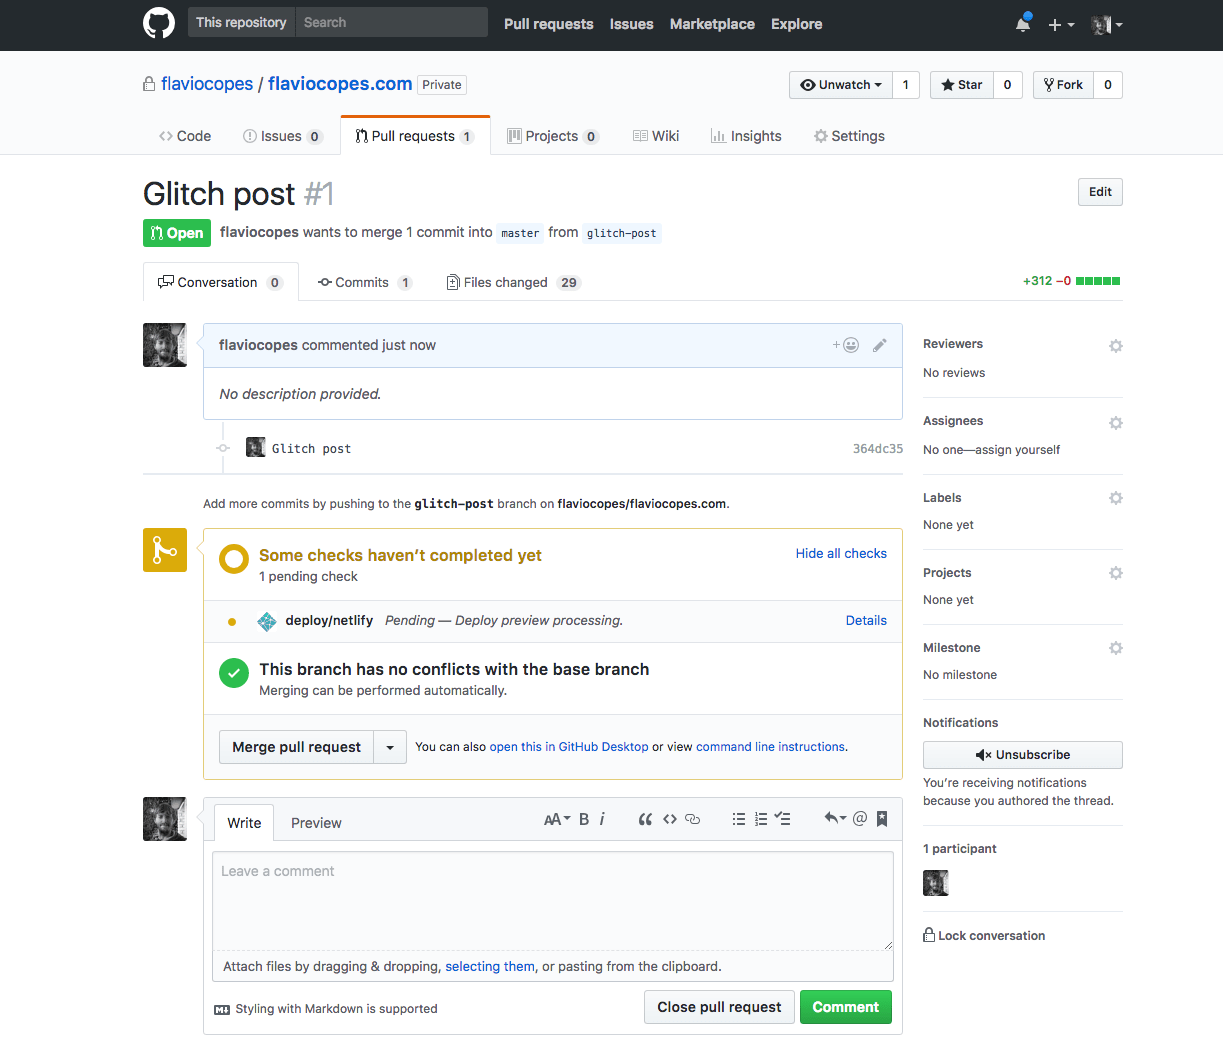
Every time you push a Pull Request, Netlify deploys that branch on a specific URL which you can share with your team, or to anyone that you want.
Here I made a Pull Request to preview a blog post, without making it available on my public blog:

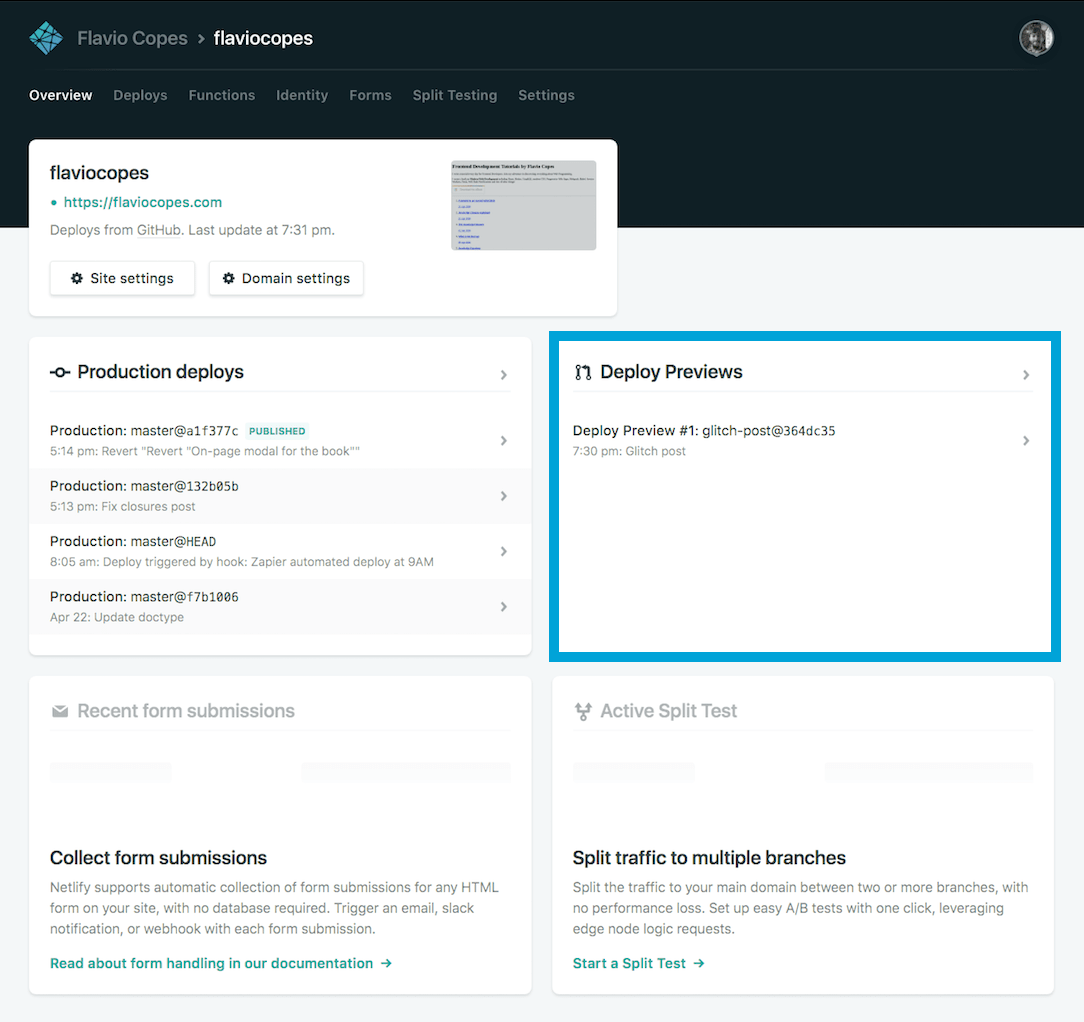
Netlify immediately picked it up, and automatically deployed it 🎉

Clicking the link points you to the special URL that lets you preview the PR version of the site.
download all my books for free
- javascript handbook
- typescript handbook
- css handbook
- node.js handbook
- astro handbook
- html handbook
- next.js pages router handbook
- alpine.js handbook
- htmx handbook
- react handbook
- sql handbook
- git cheat sheet
- laravel handbook
- express handbook
- swift handbook
- go handbook
- php handbook
- python handbook
- cli handbook
- c handbook
subscribe to my newsletter to get them
Terms: by subscribing to the newsletter you agree the following terms and conditions and privacy policy. The aim of the newsletter is to keep you up to date about new tutorials, new book releases or courses organized by Flavio. If you wish to unsubscribe from the newsletter, you can click the unsubscribe link that's present at the bottom of each email, anytime. I will not communicate/spread/publish or otherwise give away your address. Your email address is the only personal information collected, and it's only collected for the primary purpose of keeping you informed through the newsletter. It's stored in a secure server based in the EU. You can contact Flavio by emailing flavio@flaviocopes.com. These terms and conditions are governed by the laws in force in Italy and you unconditionally submit to the jurisdiction of the courts of Italy.