How to use Redis from Node.js
By Flavio Copes
Learn how to use Redis from Node.js with node-redis: connect, handle errors, store strings with a TTL, and work with lists, sets, hashes, and pub/sub.
In this post we’ll use Redis from a Node.js app with node-redis, the official Redis client for Node, available at https://github.com/redis/node-redis.
I won’t explain what Redis is or how its data types work here. If you’re new to Redis, start with my introduction to Redis.
Install the library
Install node-redis in your project. The npm package is called redis:
npm install redisTip: don’t forget to first run
npm init -yif the project is brand new and you don’t have apackage.jsonfile already.
You also need a Redis server running. The library is only the client. If you don’t have Redis on your machine yet, see how to install Redis. By default the server listens on port 6379.
Connect to Redis
Import createClient:
import { createClient } from 'redis'or, if you use CommonJS:
const { createClient } = require('redis')Then create a client:
const client = createClient()With no options, the client connects to redis://localhost:6379. That’s what you want when Redis runs on your own computer.
To connect to a different server, pass a url:
const client = createClient({
  url: 'redis://localhost:6379'
})
A hosted Redis gives you a URL with a username and password in it, plus its own host and port, like redis://default:mypassword@redis.flaviocopes.com:6380. Keep that URL in an environment variable, not in your code.
Before connecting, add an error listener:
client.on('error', (err) => {
  console.error('Redis error', err)
})
Don’t skip this step. The client emits an error event when the connection drops or fails. If nobody listens for it, Node treats it as an unhandled error and your app crashes. With a listener, your code logs the problem and the client keeps trying to reconnect.
Now connect:
await client.connect()All the client methods return promises, so we use await everywhere. Top-level await works in ES modules. In CommonJS, wrap the code in an async function.
When you’re done, close the connection:
await client.close()close() waits for pending commands to finish. The older quit() is deprecated. If you need to drop the connection right away, use client.destroy().
Here’s a complete script you can run with node app.mjs:
import { createClient } from 'redis'

const client = createClient()

client.on('error', (err) => {
  console.error('Redis error', err)
})

await client.connect()

await client.set('name', 'Flavio')
console.log(await client.get('name')) //Flavio

await client.close()
If Redis is not running, our listener prints ECONNREFUSED errors over and over, because the client keeps retrying. Stop the script with Ctrl-C, start the server, and run it again.
Store and retrieve strings
Store a string value in a key using set():
await client.set('name', 'Flavio')
await client.set('age', 37)
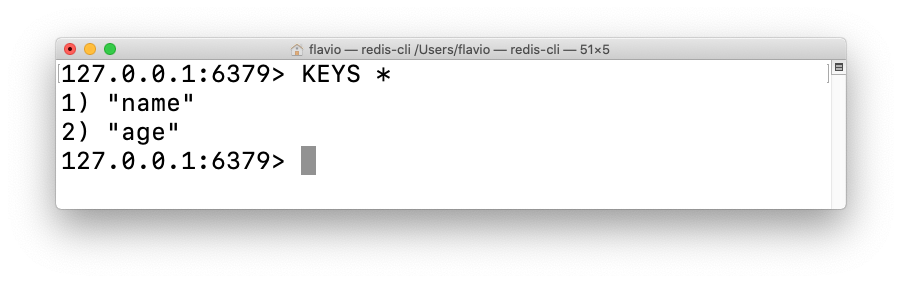
If you run KEYS * in redis-cli on a clean Redis server, you’ll see the two keys appearing:
Read a value using get():
const name = await client.get('name') //'Flavio'
const age = await client.get('age') //'37'
Notice age comes back as the string '37'. Redis stores strings, so you convert numbers back yourself, for example with Number(age).
If the key doesn’t exist, get() returns null.
Delete a key using del():
await client.del('name')Make a key expire
Often you want a key to disappear on its own after some time, like a login session or a cached API response.
Pass an expiration option to set(). This key lives for 60 seconds:
await client.set('session:flavio', 'logged-in', {
  expiration: { type: 'EX', value: 60 }
})
EX means seconds. Use PX for milliseconds.
You can also add an expiration to a key that already exists, with expire():
await client.expire('age', 60)Check how many seconds are left with ttl():
const secondsLeft = await client.ttl('session:flavio') //60When the time is up, Redis deletes the key and get() returns null. A ttl() of -1 means the key has no expiration, and -2 means the key doesn’t exist.
Working with lists
A Redis list is an ordered list of strings. The LPUSH, RPUSH, LRANGE and RPOP commands map directly to the lPush(), rPush(), lRange() and rPop() methods of the client.
Create a list by pushing the first item:
await client.lPush('names', 'Flavio')Add an item to the end of the list with rPush():
await client.rPush('names', 'Roger')Or at the start of the list with lPush():
await client.lPush('names', 'Syd')Get all the items using lRange(), passing the start and end index. -1 means the last item:
const names = await client.lRange('names', 0, -1)
//[ 'Syd', 'Flavio', 'Roger' ]
Remove and return the last item with rPop():
const last = await client.rPop('names') //'Roger'Delete the whole list with del():
await client.del('names')Working with sets
A set is a collection of unique strings, with no order. Adding the same value twice keeps just one copy. The SADD, SMEMBERS and SPOP commands map to sAdd(), sMembers() and sPop().
Create a set by adding an item:
await client.sAdd('dogs', 'Roger')Add more items at once by passing an array:
await client.sAdd('dogs', ['Syd', 'Tina', 'Roger'])Roger is already in the set, so Redis ignores it.
Get all the items using sMembers():
const dogs = await client.sMembers('dogs')
//[ 'Roger', 'Syd', 'Tina' ], in any order
Remove and return a random item using sPop():
const dog = await client.sPop('dogs')To remove more than one, use sPopCount() and pass a count. You get back an array:
const twoDogs = await client.sPopCount('dogs', 2)Be careful with sPop(). It ignores a second argument, so sPop('dogs', 2) still removes just one item.
Delete the set with del():
await client.del('dogs')Working with hashes
A hash stores field/value pairs under one key. It’s a good fit for an object, like a person with a name and an age. The HSET, HGETALL and HINCRBY commands map to hSet(), hGetAll() and hIncrBy().
Create a hash by passing an object to hSet():
await client.hSet('person:1', { name: 'Flavio', age: 37 })Get all the fields using hGetAll():
const person = await client.hGetAll('person:1')
//{ name: 'Flavio', age: '37' }
Like with strings, values come back as strings.
Update a single field with hSet(), passing the field and the value:
await client.hSet('person:1', 'age', 38)Increment a number stored in a field using hIncrBy(). It returns the new value:
const age = await client.hIncrBy('person:1', 'age', 1) //39Delete the hash with del():
await client.del('person:1')Publish/subscribe
Pub/sub is an amazing feature of Redis. One part of your app sends a message, and other parts receive it right away.
A publisher sends a message on a channel, which is a name like dogs. Every client subscribed to that channel receives it. Redis doesn’t store the message, so if nobody is subscribed when you publish, the message is gone.
You could use this to tell other processes that something happened, for example that a new order came in.
Be aware that you can’t publish and subscribe from the same client. A client that subscribes to a channel enters subscriber mode, and can’t run regular commands like set() or publish() anymore. So we need two connections, one to subscribe and one to publish.
The easiest way to get a second client with the same options is duplicate():
const publisher = createClient()
const subscriber = publisher.duplicate()

publisher.on('error', (err) => console.error('Redis error', err))
subscriber.on('error', (err) => console.error('Redis error', err))

await publisher.connect()
await subscriber.connect()
Now subscribe to the dogs channel. The callback runs every time a message arrives:
await subscriber.subscribe('dogs', (message, channel) => {
  console.log(`${channel}: ${message}`)
})
Then publish a message on the same channel:
const receivers = await publisher.publish('dogs', 'Roger')The subscriber callback prints dogs: Roger. publish() returns how many subscribers received the message, 1 in this case.
The two clients can live in the same script, like here, or in two different Node processes. Redis doesn’t care, as long as both connect to the same server.
When you’re done, stop listening and close both connections:
await subscriber.unsubscribe('dogs')
await subscriber.close()
await publisher.close()Want me to talk about your product? You can sponsor this site.