How to use the Drag and Drop API
By Flavio Copes
Learn how to use the HTML Drag and Drop API, marking elements draggable, setting drop targets with dragover, and handling events like dragstart and drop.
Using the Drag and Drop API you can define which elements in the page are draggable, and intercept when the user drags an element.
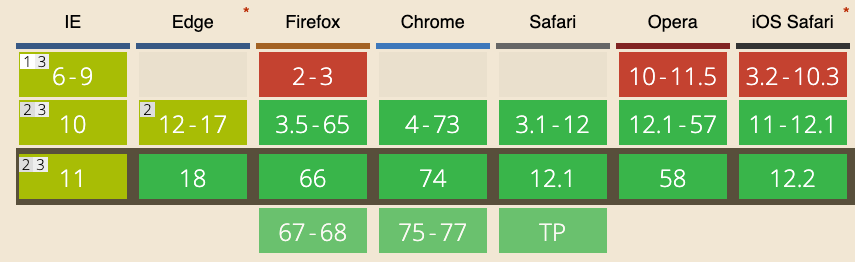
It’s very well supported on modern browsers:
Before we start studying the API, we must know how to define which elements in the page are draggable. We can do so by adding the draggable attribute in the page HTML, with a value of true:
<div draggable="true">...</div>This is enough to make the element draggable.
Tip: images, text selections and links are draggable by default unless you set
draggableto false on them
We can also drag files from the user computer inside the browser. In this case we are transferring files.
Where can we drag elements to is another point we need to clarify. As well as we can’t just drag any element, we can’t also just drop into any element. The element must be valid drop target.
To make an element a drop target you listen for its dragover event and you either return false from it, or you call preventDefault() on the event passed:
const element = document.querySelector('#my-drop-target)
element.addEventListener('dragover', event => {
  event.preventDefault()
})
Once we do so, we have a draggable element and a drop target, and we can start. The events we can interact with on the draggable element are:
dragstartdragdragend
On the drop target:
dragenterdragoverdragleavedrop
Overview of a drag and drop operation and the events fired
When the user starts dragging a draggable element, clicking on it with the mouse and moving the mouse, or also tapping and keeping the tap and then moving the selection, the dragstart event is fired on it:
element.addEventListener('dragstart', (event) => {
  //...
})
The event object passed as parameter to the event handling function is a DragEvent object.
It extends from the more general Event object, shared with all the other events: mouse, keyboard, scrolling, etc.
At this point, the element is being dragged, and the drag event is fired. Multiple times as the item is being dragged, so we must use throttling like for the scroll or mouseover events.
As soon as we enter a drop target:
- the
dragenterevent is fired on the drop target - the
dragoverevent is fired on the drop target
If a dragged element first enters a drop target and then moves away from it, the dragleave event is fired on the drop target.
If the user releases the mouse, the dragend event is fired on the element that is being dragged, and a drop event is fired on the drop target.
Dragging data: DataTransfer
Every event related to drag and drop comes is a DragEvent object as I mentioned, and it comes with a property called dataTransfer which holds the data being dragged, and offers 5 properties:
dropEffecteffectAllowedfilesitems(read only)types(read only)
When the drag event starts, you can do a few operations.
Set / get the effect
You can set the desired effect of the drag operation by setting the effectAllowed property in the dragstart event. You have a few options which set how the drop target should handle the dropped element:
noneit shouldn’t be droppedmoveit can be movedcopyit can be copiedlinkit can be linkedcopyMoveit can be copied or movedcopyLinkit can be copied or linkedlinkMoveit can be moved or linkedallit can be copied, moved or linked
(all are strings).
The default is all.
The dropEffect property is used to get the type of the drag and drop operation, which this time is set by the user through the use of modifier keys. For example, on a Mac pressing the Alt key sets the drop target to copy the item instead of moving it.
This property is not read only. We can edit it in a dragenter or dragover event, to one of those string values:
noneit shouldn’t be droppedmoveit can be movedcopyit can be copiedlinkit can be linked
Example:
element.addEventListener('dragenter', (event) => {
  event.dataTrasfer.dropEffect = 'move'
})
The data being transferred
You can access the items being transferred from the dataTransfer.items property, which is an array-like object which you can iterate using a loop and get access to each DataTransferItem object.
DataTransferItem has 2 read-only properties:
kind: the kind of the item being dragged. Returns a string containingfileorstringtypethe MIME type of the item
and it has 2 methods:
getAsFile()returns aFileobject representing the data being draggedgetAsString()executes the callback function pasing a string object representing the data being dragged
They have a similar name but work very differently. The first returns a File object:
element.addEventListener('dragenter', (event) => {
  for (item of event.dataTrasfer.items) {
    const theFile = item.getAsFile()
  }
})
Learn more about File objects at https://flaviocopes.com/file/
The second passes the item as a string to a callback function:
element.addEventListener('dragenter', (event) => {
  for (item of event.dataTrasfer.items) {
    item.getAsString((theString) => {
      console.log(theString)
    })
  }
})
The types of items files being dragged is stored in the types property of the dataTransfer object. It is an array containing the string string by default. If we are dragging a file, the corresponding type is a string of value Files.
If there are files being transferred, in addition to being listed in dataTransfer.items, they are stored in the files property of dataTransfer.
This property points to a FileList object listing the files being dragged.
Check out this demo on Codepen: https://codepen.io/flaviocopes/pen/JqXZoB/
Related posts about platform: