A deep dive into ChatGPT Sites
By Flavio
Tagged: AI
ChatGPT Sites turns a prompt into a hosted website or small web app. How to use it step by step, what runs under the hood, what hosting will cost, and its limits.
ChatGPT Sites lets ChatGPT build a website or a small web app, host it, and give you a link to share. You describe what you want in a chat, review a private preview, and decide who can open it.
It’s not limited to static pages. A Site can have a database, file uploads, Sign in with ChatGPT, secrets, analytics and a custom domain. Under the hood every Site is a Cloudflare Worker, running on hosting that OpenAI manages for you.
OpenAI launched Sites in public beta on July 9, 2026, together with ChatGPT Work. This post follows the Sites plugin 1.1.6, the current version in November 2026. Your plan and your workspace’s settings change which controls you see, so some steps can look different in your account.
We’ll start from a prompt and end with the code Sites writes, using a small RSVP page for a JavaScript meetup as the example. I ran that code on the Sites starter on my computer, not on a deployed Site.
What is ChatGPT Sites?
A Site is a website that lives in your ChatGPT account. It has a URL, a list of saved versions, access settings, and optionally a database and file storage.
You create it by chatting. ChatGPT writes the code, shows you a preview, and publishes it. Later you reopen the Site, ask for changes, and ChatGPT publishes a new version to the same URL.
OpenAI pitches it for work: dashboards, project trackers, launch calendars, internal portals, onboarding pages, interactive reports. The Sites showcase also has games, 3D scenes and small storefronts, so the range is wider than the pitch.
Every Site appears in the Sites list, at chatgpt.com/sites or under Sites in the desktop app sidebar. It stays there after the chat that created it ends. A Site is also separate from a ChatGPT Project.
Who can use it?
Sites is available on Plus, Pro, Business and Enterprise. Free and Go don’t include it. In a managed workspace, your role and your administrator’s settings decide whether you can use it, and public publishing starts disabled in Enterprise.
Building and editing a Site uses your Codex allowance. Hosting is counted separately, by traffic and storage, and it’s free through December 31, 2026.
From January 1, 2027, each plan gets a monthly hosting allowance, shared by all your Sites, and you pay for what goes above it:
| Plan | Monthly hosting allowance |
|---|---|
| Plus | 125 credits |
| Pro | 375 credits |
| Business | 125 credits per seat |
| Enterprise | Drawn from the organization’s credit pool |
These are the proposed rates, so check them again before you estimate a project:
| What you use | Unit | Credits |
|---|---|---|
| A Site without storage | 1 Site per month | 0 |
| A Site with storage, even an empty database | 1 Site per month | 25 |
| Traffic | 100,000 requests | 16 |
| Database storage | 1 GiB stored for a month | 150 |
| File storage | 1 GiB stored for a month | 3.75 |
| Custom domain | 1 domain per month | 25 |
| Private connection (Enterprise only) | 1 tunnel per month | 125 |
A page visit usually takes 30 to 50 requests. With these rates a static page costs nothing to keep online, and the Plus allowance covers five Sites with an empty database before any traffic. Saved records cost forty times more per gigabyte than files, so keep uploads in file storage and only their details in the database.
There’s no limit on how many Sites you can create. From December 1, 2026 you can see the traffic and storage usage of each Site.
Where you build a Site
You can start a Site from:
- ChatGPT on the web, in Work mode
- the ChatGPT desktop app, in Work mode or in Codex
Work is for when you don’t care about the code. Codex is for when you do: it works on a folder on your computer, so you can open the files in your editor, run the project, and use Git.
The Codex CLI and the IDE extension have no Sites view. You can edit and test a Sites project there, but creating, deploying and managing the Site happens in ChatGPT on the web or in the desktop app. The old desktop app, now called ChatGPT Classic, doesn’t have Sites at all.
If you’re new to the Codex side of the desktop app, start from my complete guide to Codex.
Build your first Site
To start the Sites workflow, include the word “website” in your prompt, or mention @Sites.
A good prompt says who the Site is for, what they need to do on it, and what information it should use. This is the one we’ll follow in this post:
@Sites Build a website for Frontend Friday, a monthly JavaScript meetup.
Show the next event: October 30 at 7pm, two talks, one about View
Transitions and one about Node.js streams. Let people RSVP by signing in
with ChatGPT, and show how many people are going. Keep the RSVPs saved
between visits.
On the web, Create > Site in the Sites list opens Work with “Create a new site with @Sites” already in the composer. Type @Sites and pick the plugin from the menu, and it turns into a chip in front of your prompt:
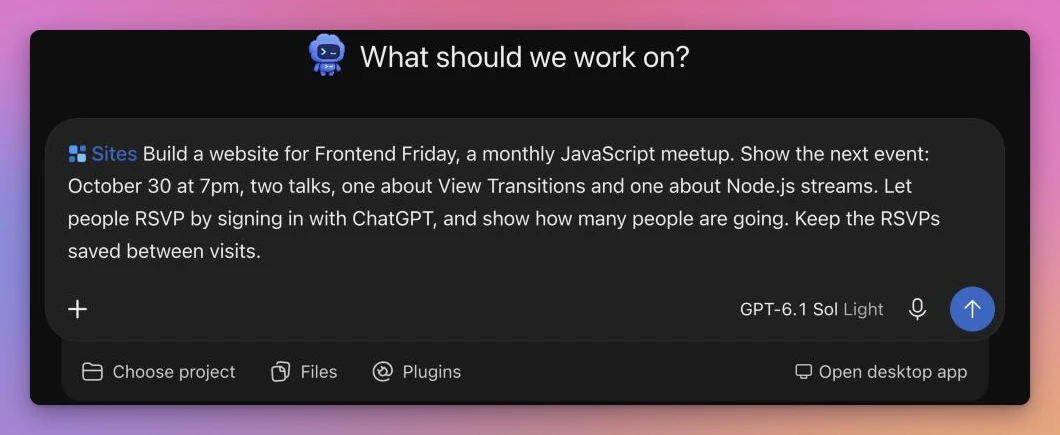
You don’t need to name any technical pieces. ChatGPT infers them from what you describe: “saved between visits” means a database, and “signing in with ChatGPT” means Sign in with ChatGPT.
The date in this example belongs to the sample event. Use your own event date, then check the generated page for it before sharing the link.
ChatGPT builds the page and shows you a preview. In Codex that’s the built-in browser, next to the chat. When the page is ready, ask to deploy it privately and open the resulting URL.
When I sent this prompt on the web, ChatGPT worked for 2 minutes 37 seconds and deployed the Site on its own, at frontend-friday-meetup.copesc.chatgpt.site. The reply says what it checked: saving, duplicate RSVPs and cancelling worked locally, and the hosted sign-in was still untested. It also points out that it showed the date without a year or time zone, because the prompt had neither. The preview opens next to the chat:
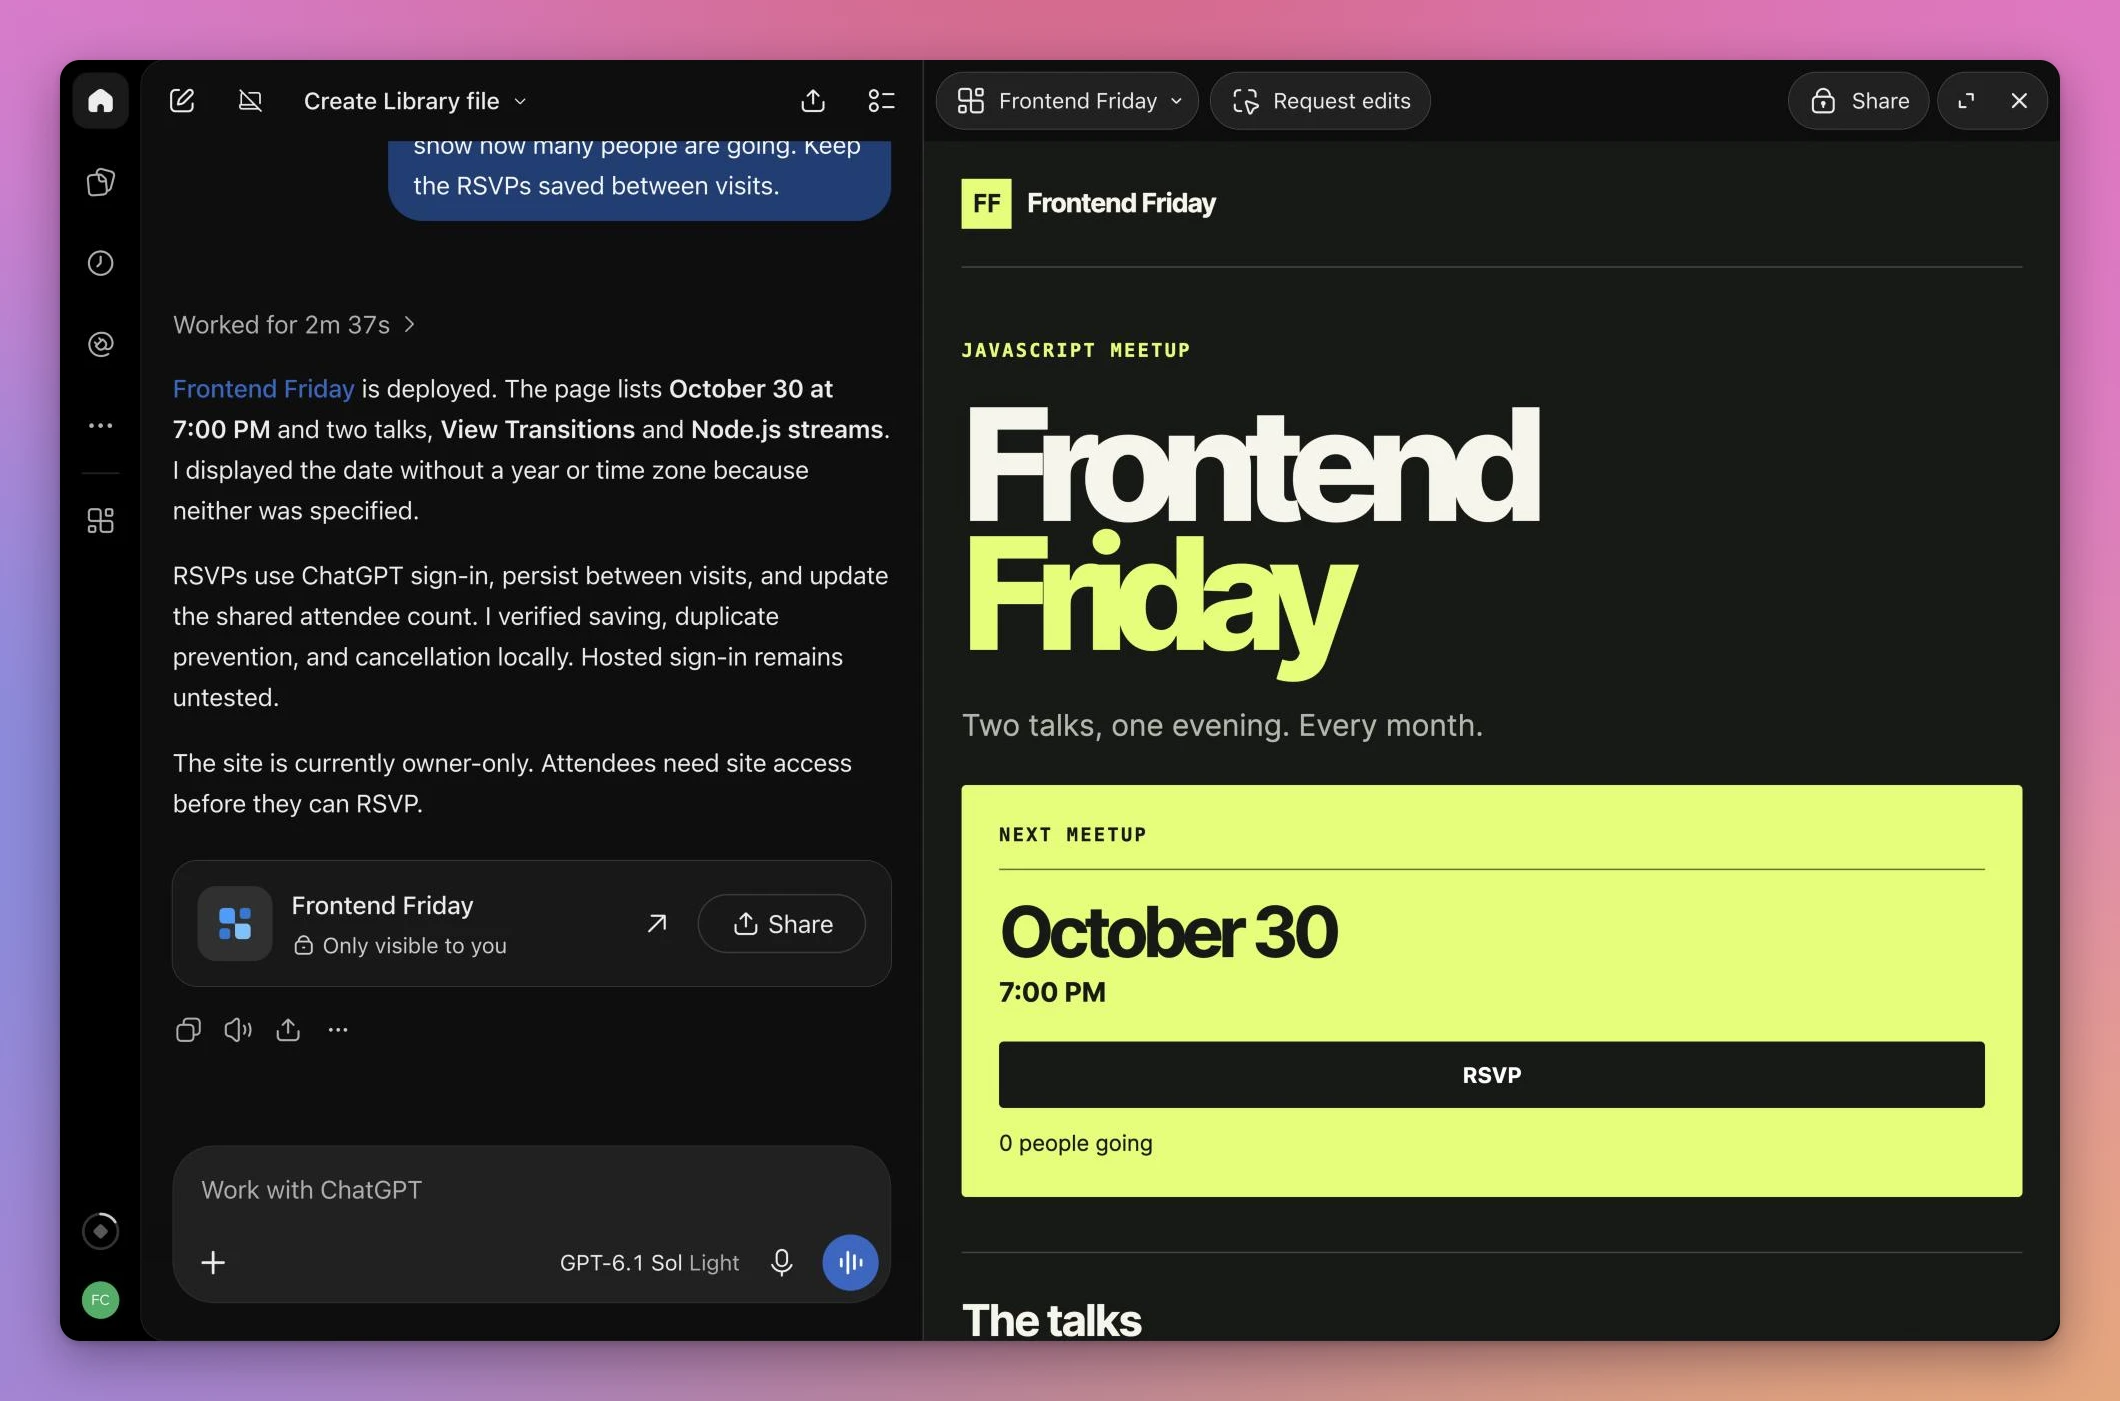
A new Site is visible only to you and your workspace admins. Nobody else can open the link until you change its access, so you can iterate without worrying about who sees what.
Before opening access, try the RSVP flow yourself. Sign out, sign back in, submit once, then submit again. The count should increase only once for the same account. Reload the page to check that the result was saved.
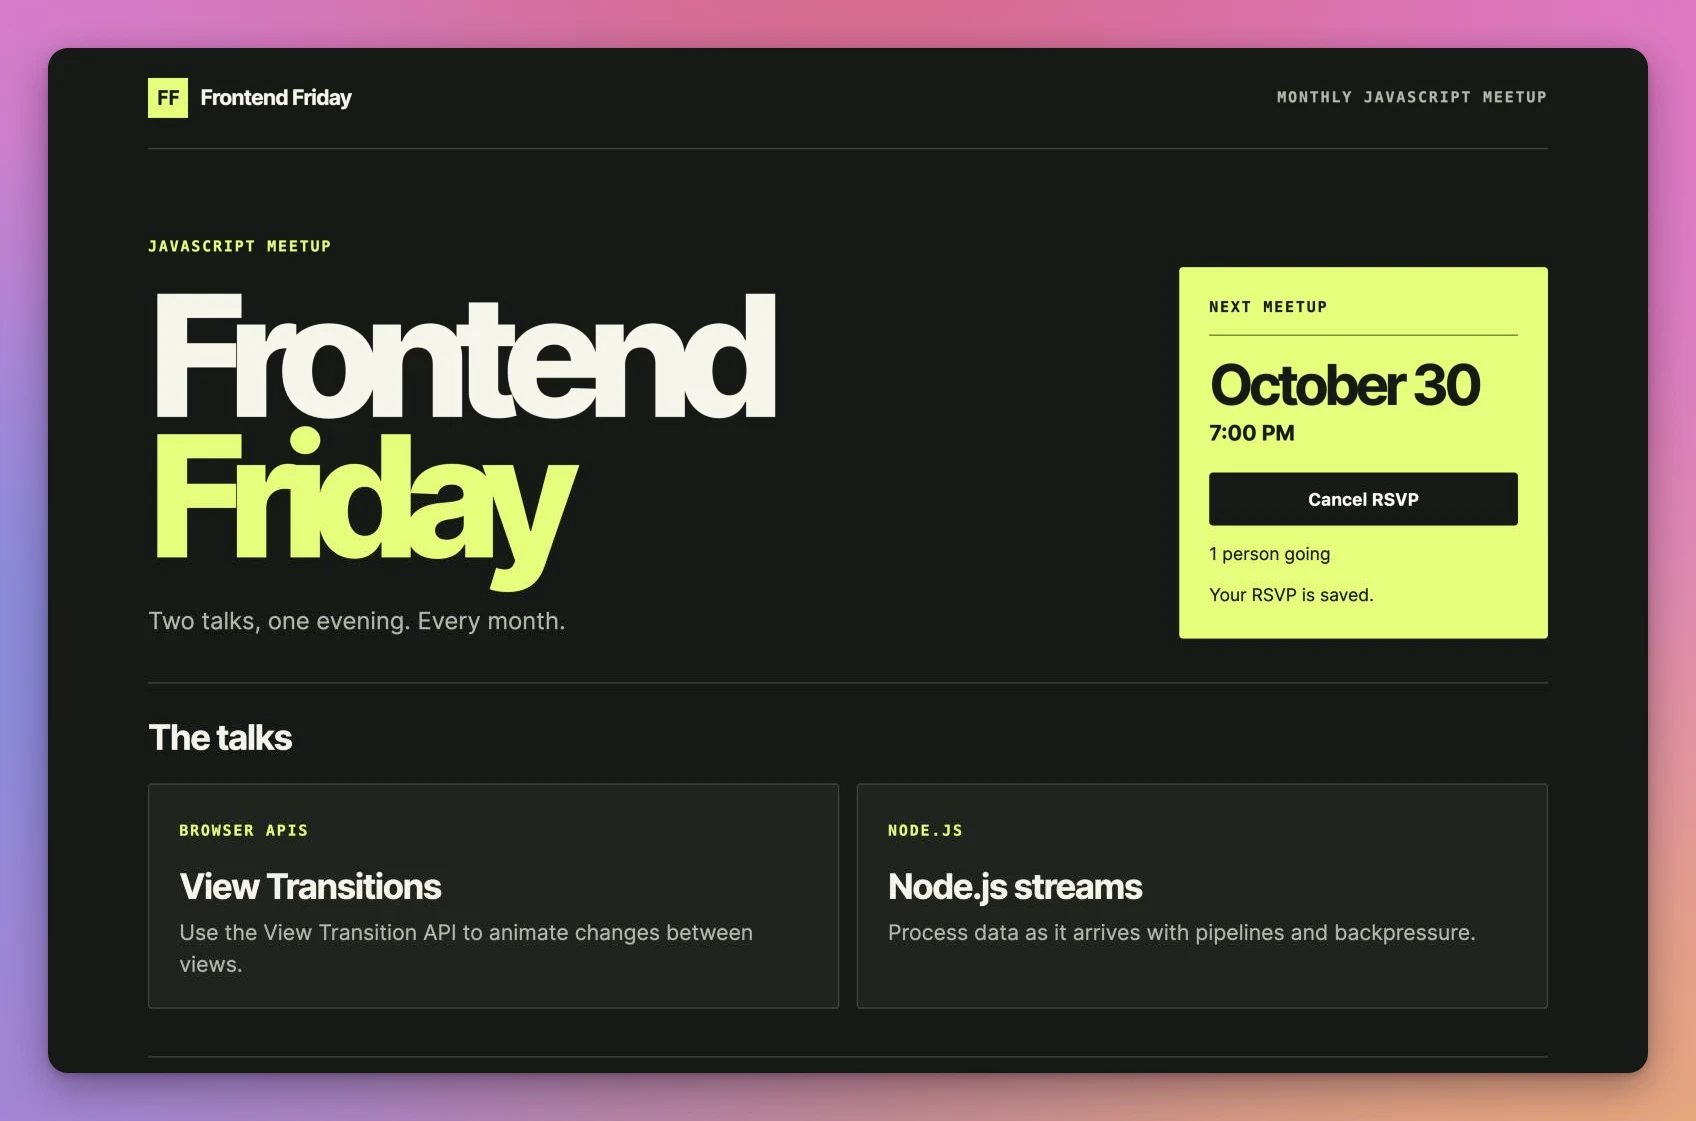
On the deployed Site, I had to sign in with ChatGPT first, even as the owner, and enter a code OpenAI sent to my email. After one RSVP the button turned into Cancel RSVP, and the count still said 1 person going after a reload:
Refine it
Now you iterate by chatting. Ask for the change you want, the same way you’d ask a colleague:
Add a section with the two speakers, their photos, and a link to each
talk's slides. Make the RSVP button the first thing people see on mobile.
Attach files when they help: a logo, the speakers’ photos, a CSV with data, a screenshot of a layout you like.
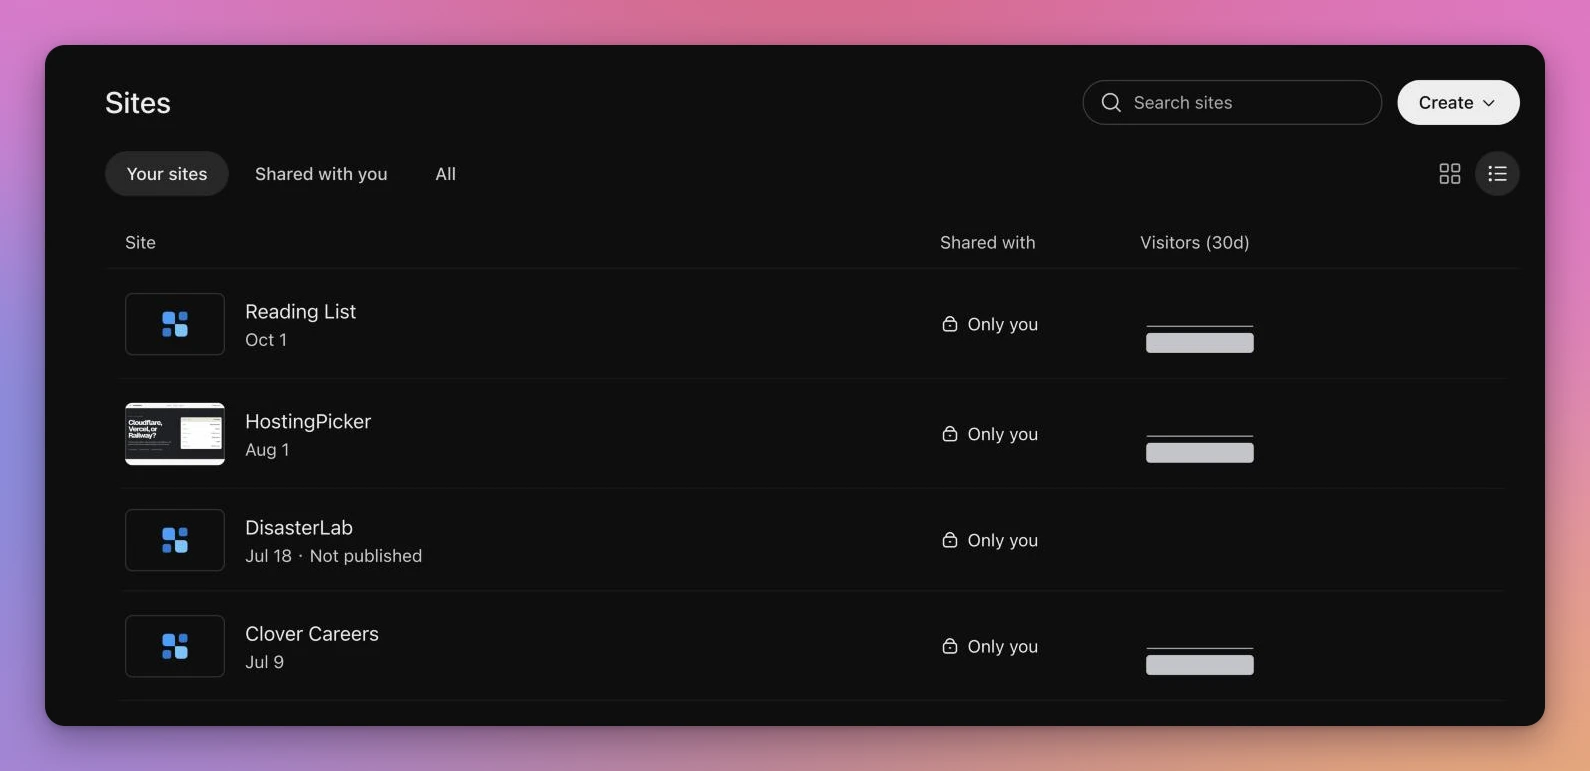
To get back to a Site later, open the Sites list. It shows each Site with its last update, who it’s shared with, and a visitors sparkline for the last 30 days (I covered my numbers):
Open a Site and it fills the window, with a chat box floating at the bottom that already says “Make these changes to” followed by the Site. Write the change after it. Request edits, in the top bar, lets you select a part of the page and ask for changes to that part:
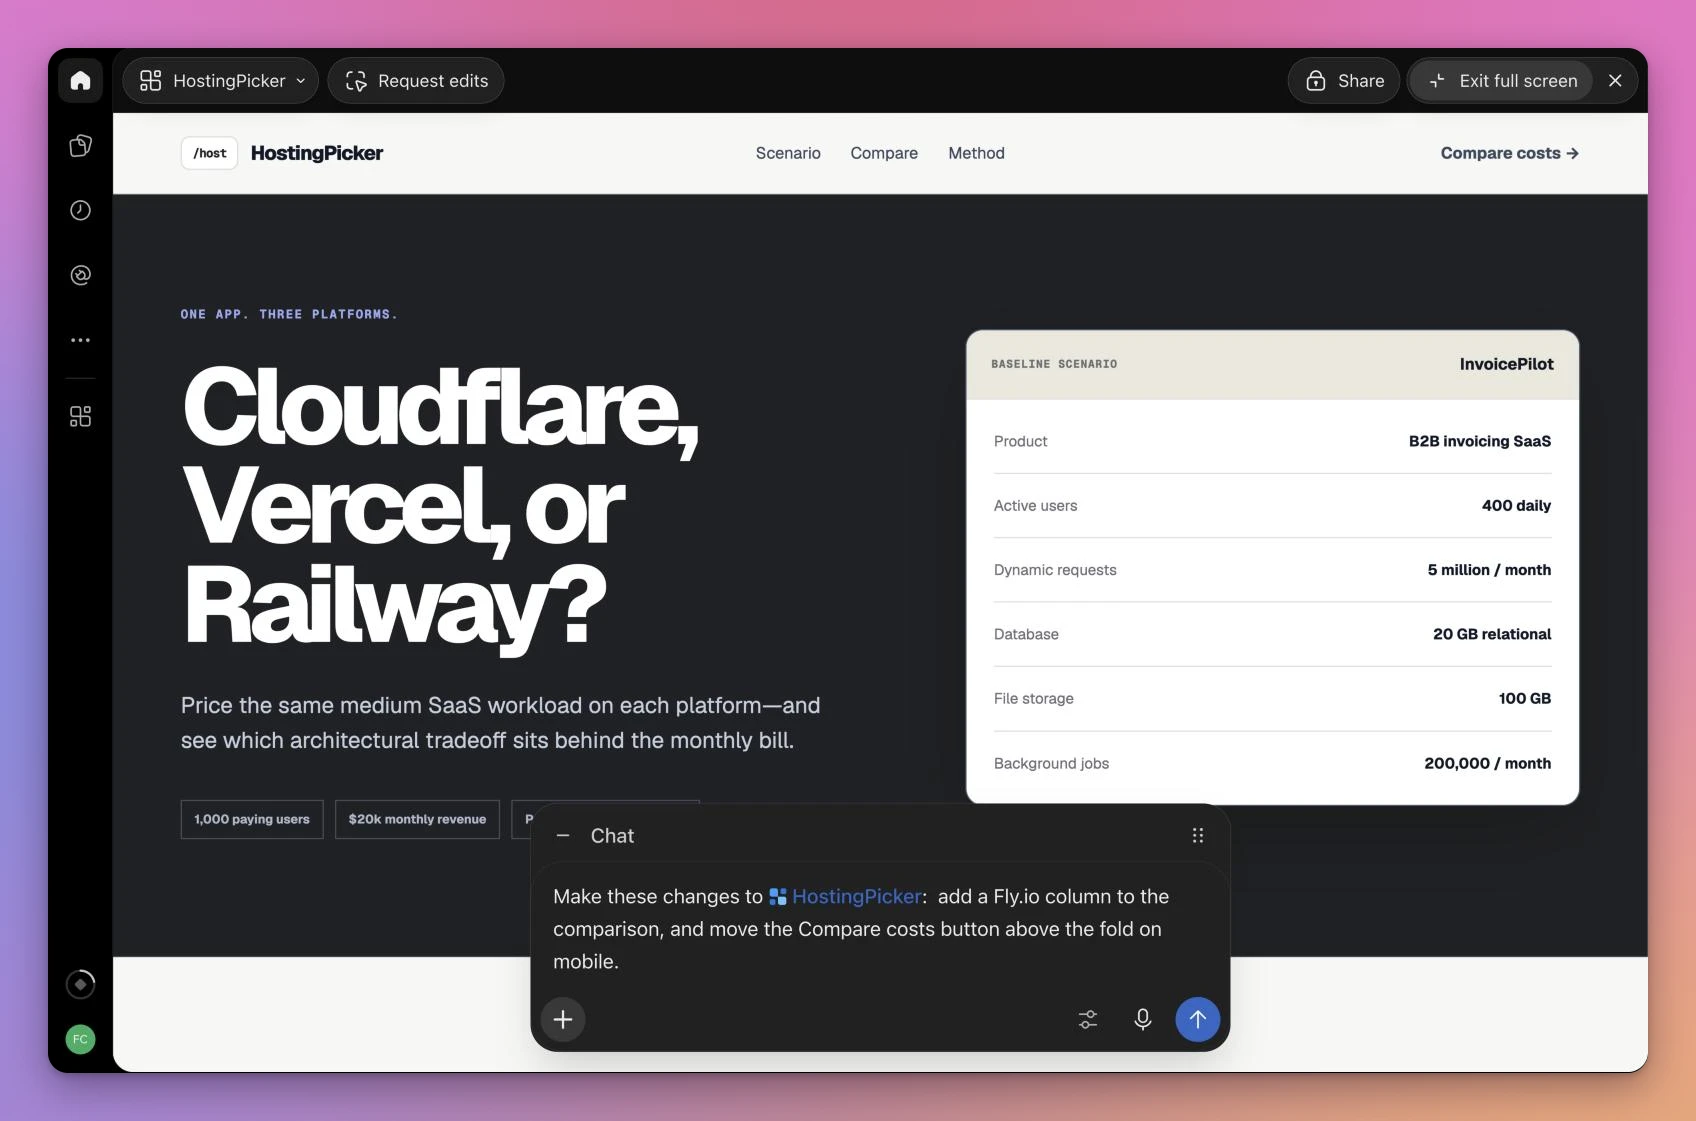
You can also start an edit from the published Site. Open it in a desktop browser while signed in as the owner or an editor, select Edit site, describe the change under Describe your edits, and select Send edits. The work continues in ChatGPT, and the live Site doesn’t change until you publish.
Start from someone else’s Site
In a workspace, Remix creates a new Site from one a coworker already published. Open their Site while signed in with your workspace account, select Remix in the toolbar in the lower-right corner, then say what to keep and what to replace.
A remix copies the published source into a new Site with its own history. Database records, stored files and settings like secrets aren’t copied.
Every deploy goes to production
Every Sites deployment updates the live Site, and there’s no separate staging URL. Keep that in mind before you share a link.
Publishing has two steps:
- Save a version. ChatGPT builds the Site and stores that build as a version. When the Site comes from a local project, the version is tied to the Git commit it was built from.
- Deploy a version. ChatGPT publishes a saved version to the Site’s URL.
Saving and deploying are separate actions, but the default is to do both. The Sites skill tells the agent to publish finished work unless you ask for local-only work or for a save without a deployment. When I asked Codex to “continue” on a prototype in August, it built the page and published it privately without a separate deploy request.
If you want to review a change before your audience sees it, say so:
Save a version with the new speakers section, but don't deploy it yet.When you need an older build, ask ChatGPT to list the saved versions, and deploy the one you want. Going back to an earlier version restores the code, not the database or the uploaded files.
Choose who can see your Site
Open the Site and select Share. Depending on your plan and workspace, Who has access offers these options:
- Owner and workspace admins, the default
- Selected active users or groups
- Only those invited, for named people, including people outside your workspace
- Anyone in the workspace
- Anyone on the internet, when public publishing is allowed
Pick the narrowest option that works. Visitors can open and use the Site, but they can’t edit it.
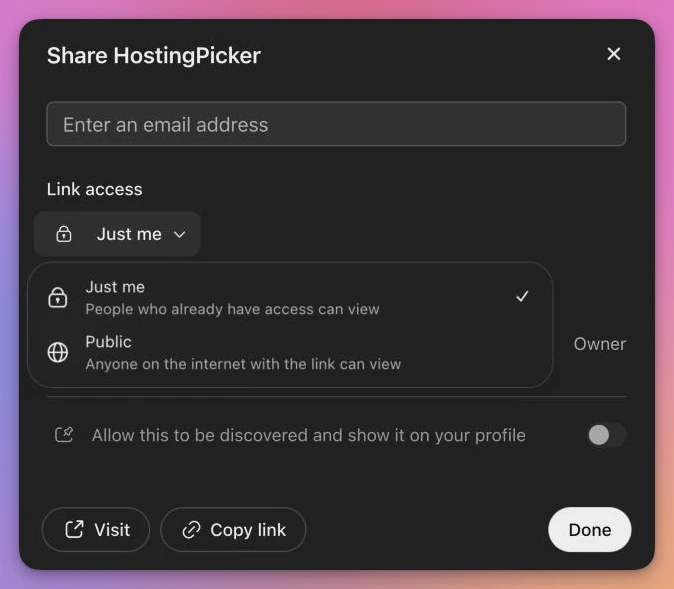
On my personal account the dialog is simpler. You can invite someone by email, and Link access has two choices, Just me and Public. There’s also a switch to let people discover the Site and show it on your profile:
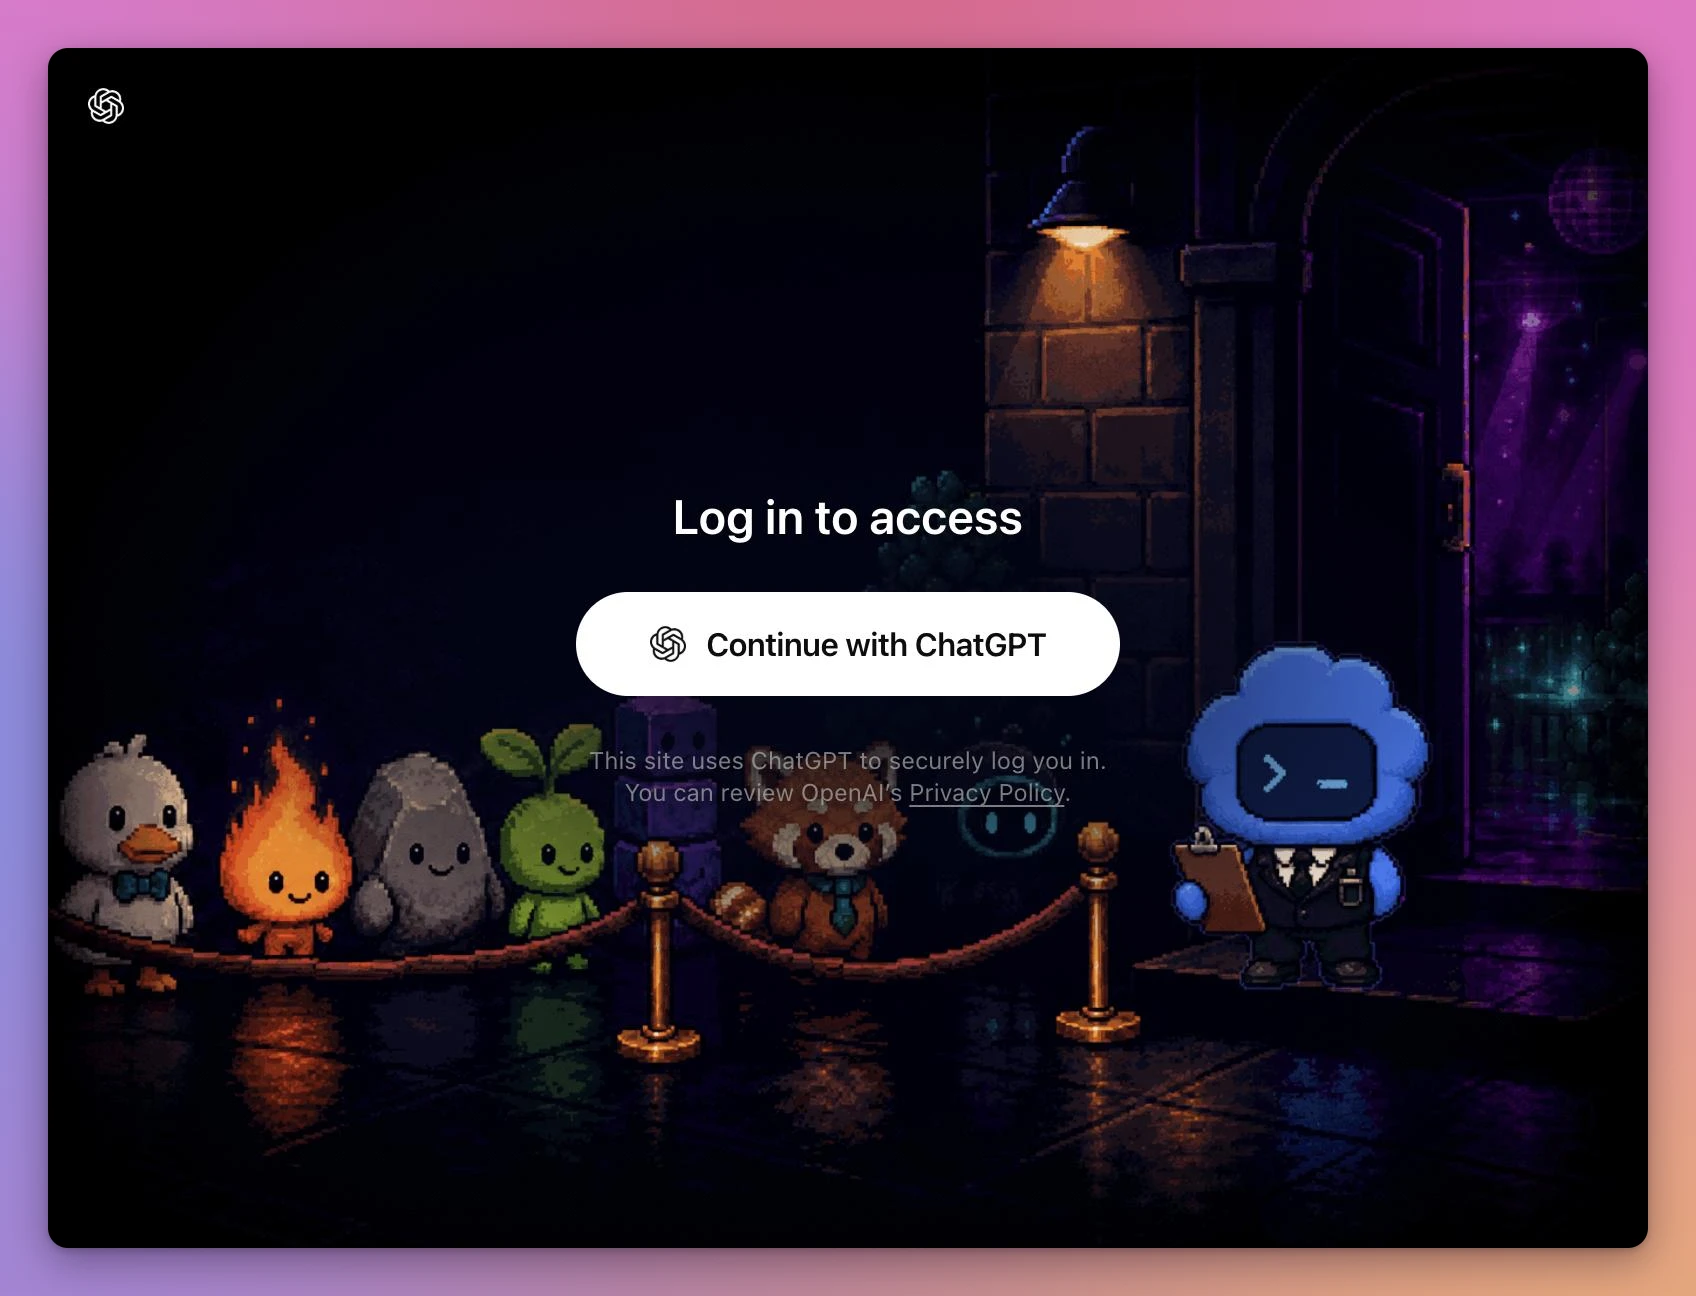
For every option except the public one, visitors sign in with the account that received access. Someone who isn’t signed in gets a 401 response. This is one of my private Sites, requested without signing in:
curl -I https://hostingpicker.copesc.chatgpt.siteThese are the response headers, without the date and the cookie:
HTTP/2 401
content-type: text/html; charset=utf-8
cache-control: no-store
referrer-policy: no-referrer
server: cloudflare
In a browser, the same address shows this page:
You can also ask ChatGPT to change the access for you. Have it show you the Site first, so you know which one you’re opening up:
Change this Site's access to everyone in my workspace after showing me the
current Site and confirming its URL.
Invite people outside your workspace
External invitations started rolling out on September 3, 2026. They give a named person access to a Site without making it public, and they also work from a personal Plus or Pro account. In Enterprise, an admin first has to turn on Allow members to invite external visitors to sites.
- Open the Site and select Share.
- Set Who has access to Only those invited.
- Enter the person’s email address and select them.
- Check that they have Viewer access, then select Invite.
- Share the Site’s link and ask them to sign in with that email address.
Removing an invitation removes only that invitation. If the Site is also shared with the whole workspace or published publicly, the person can still open it.
Let teammates edit
In a workspace, the owner can turn another member into an editor. Open Share, add the person, then switch them from Can view to Can edit. The Site shows up under Shared with you in their Sites list.
Editors can change the Site, save versions and publish updates. They can’t change who has access, manage settings (secrets and custom domains are there), see analytics, or transfer ownership. They also can’t do the first publish: the owner has to publish the Site once, then editors can publish later versions.
There’s no approval step between an editor and production, so agree on how you review changes. Editors can also read the Site’s live database, so only invite people you’d trust with that data.
The owner can transfer a Site to another active member of the workspace, and stays on it as an editor.
Add a database and file storage
A Site can keep data in two places:
- D1, a SQLite database, for records like RSVPs, tasks, scores, comments or settings
- R2, object storage, for files like images, PDFs, audio, video or exports
When uploaded files need to be searchable, a Site uses both. The file goes to R2, and its details (owner, name, type, date) go to a D1 table.
You ask for them in plain words, like we did with “keep the RSVPs saved between visits”. This is the request for speaker slides:
Let each speaker upload their slides as a PDF after signing in. Keep the
files between visits, and show a download link next to each talk.
For a theme choice that only needs to survive on one browser, local browser storage may be enough. RSVPs need shared server storage so another visitor sees the same count.
Each Site can store up to 10 GB in D1. R2 has no fixed storage limit per Site, but the beta usage limits still apply.
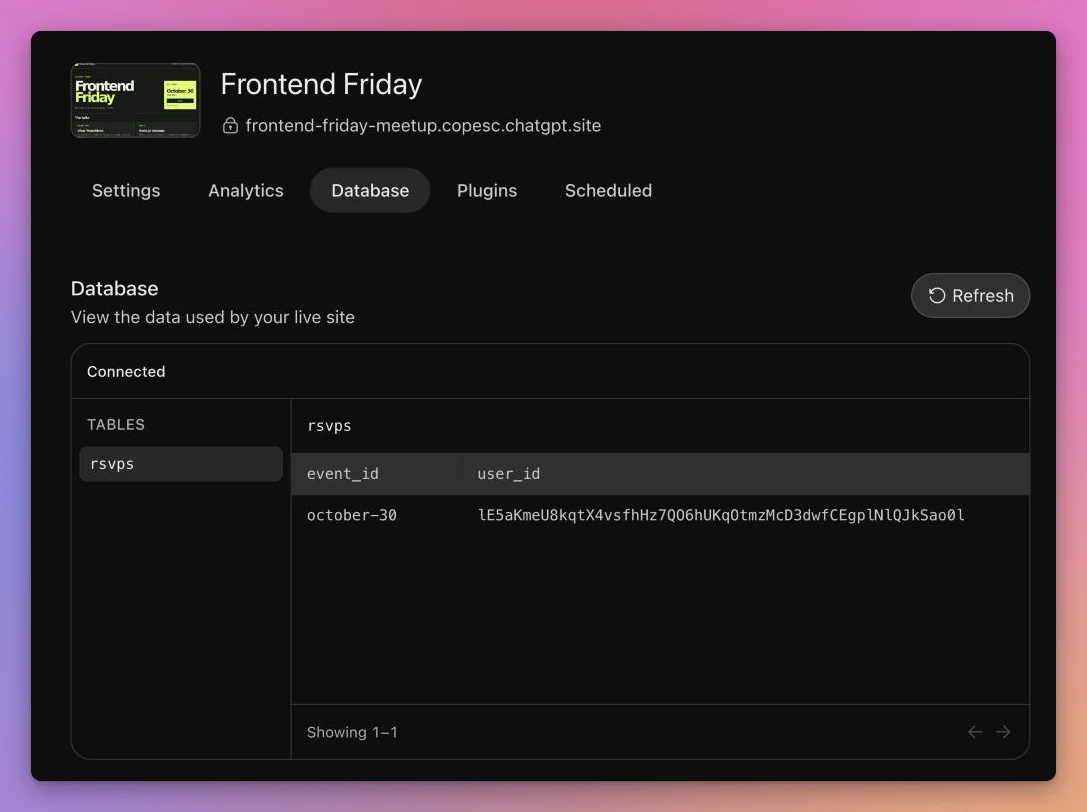
The Site’s Database tab shows the tables of the live database. After my RSVP, the Frontend Friday Site has an rsvps table with one row: the event, october-30, and a user_id. That ID is an opaque string, and the table doesn’t store my name or email:
Sites uses Cloudflare’s D1 and R2, created and managed by OpenAI. If they’re new to you, I have posts on Cloudflare D1 and Cloudflare R2.
Add Sign in with ChatGPT
A Site’s access setting and signing in inside the Site are two separate things.
A public Site can stay open to everyone and still offer Sign in with ChatGPT for the parts that need to know who you are: saved progress, a personal view, records that belong to one person. Private and workspace Sites already know who the visitor is, because visitors had to sign in to open them.
This is the prompt OpenAI’s docs suggest, and it’s a good template. It says what signed-out visitors see, what signed-in visitors see, and where the checks happen:
Add Sign in with ChatGPT to this public Site. Keep the Site available to
signed-out visitors. Show a Sign in with ChatGPT action when someone is
signed out. After they sign in, greet them with their full name when
available, or their email address otherwise. Add a Sign out action, and
keep authorization decisions in server-side code.
Sites runs the sign-in flow for you. Your Site only links to two paths that the platform owns:
<a href="/signin-with-chatgpt">Sign in with ChatGPT</a>
<a href="/signout-with-chatgpt">Sign out</a>
After someone signs in, every request that reaches your server code carries their identity in these headers:
oai-authenticated-user-id, a stable ID for that person on this Siteoai-authenticated-user-email, their email addressoai-authenticated-user-full-name, their name, when their profile has one
Use the ID as the key for anything that belongs to a person. It stays the same for the same person on the same Site, and it’s different on every other Site. Treat the name as optional and fall back to the email.
Sign-in tells you who someone is, not whether they’re allowed to do something, and any ChatGPT user can sign in to a public Site. If a page is for your team only, use the Site’s access settings, or check the email against a list in your server code.
If your Site uses sign-in, tell visitors what information it receives and what you do with it. Complying with privacy law is on you, not on OpenAI.
Call a private Site from a script
A script or another service can’t go through the sign-in page. For that case, the owner asks ChatGPT or Codex for a bypass token:
Generate a Sign in with ChatGPT bypass token for this site so my service
can call it without signing in through a browser.
The script then sends the token in a header:
OAI-Sites-Authorization: Bearer <token>A request with the token passes the sign-in gate, but it has no visitor identity, so the oai-authenticated-user-* headers are missing. Generating a new token replaces the old one, which can keep working for up to five minutes. Store the token like any other secret.
Secrets and environment variables
Sometimes a Site needs a secret, like the API key for an email service.
Never paste a secret in the chat, in an attached file, or in the Site’s content. Open the Site’s settings instead (on the web, find the Site and select More actions > Settings) and add it as an environment variable marked as secret. Only the owner can manage secrets.
On regional hosting, changing an existing secret can affect the live Site immediately. Adding or removing configured keys still requires publishing. Other Sites apply saved variable changes on publication. Check the environment-variable behavior before rotating a value.
If the Site calls the OpenAI API, Codex can create an API key for it with your approval and store it as a Site secret, through the OpenAI Developers plugin.
In a local project, keep the variable names in .env.example and the real values in .env. The starter’s .gitignore already keeps .env files out of Git.
Change the URL or use your own domain
A Site’s URL looks like this:
https://hostingpicker.copesc.chatgpt.siteThe first part is the Site’s name. The second part is your username, or your workspace’s name. For new Sites on a personal account, Sites now puts a random identifier there instead of your username, unless you made your profile public or changed your username. Check the full address before you share it.
The owner can change the Site’s name and URL in its settings, and the old address redirects to the new one. The same page has the custom domain, the sharing setting and the environment variables, and tabs for analytics, the database, plugins and scheduled tasks:
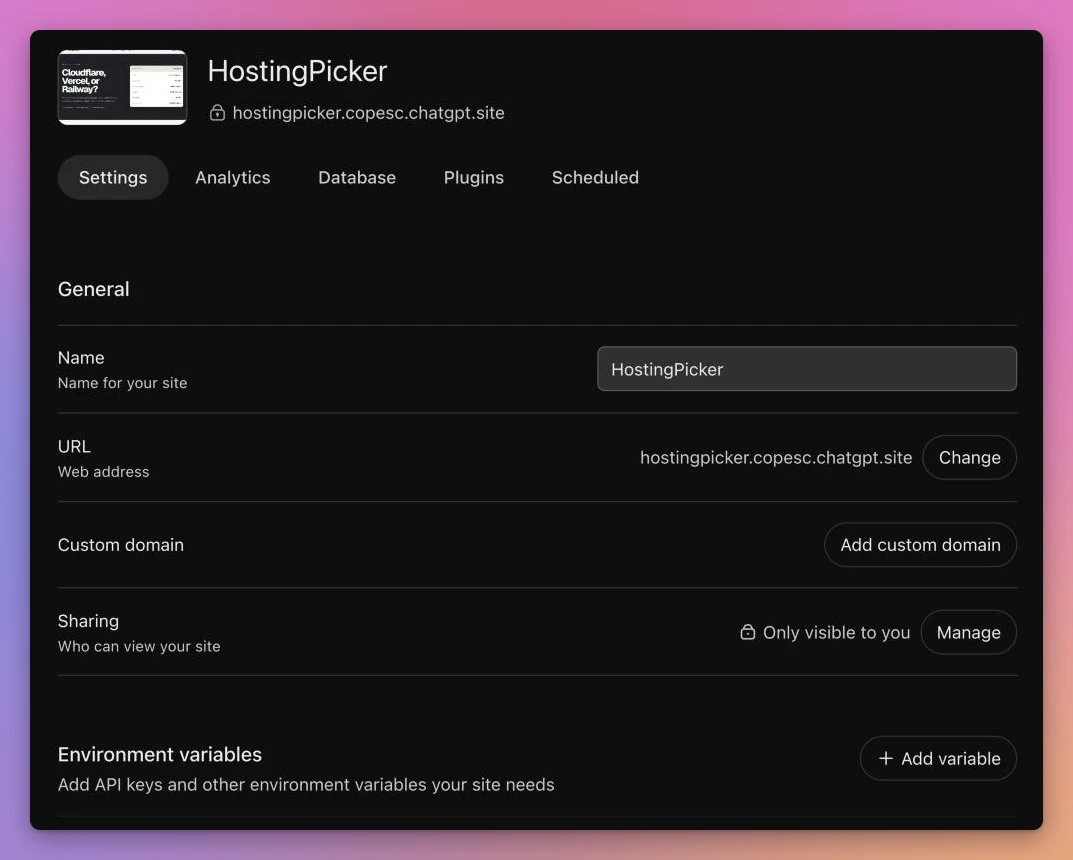 Changing your ChatGPT username, under Settings > Account > Username, can change the account part of all your personal Site addresses.
To use your own domain, you need to already own it, because Sites doesn’t register domains. Then:
- Open the Site’s settings and select Add custom domain.
- Enter the domain or subdomain, for example
meetup.flaviocopes.com. - Copy the DNS records Sites shows you and add them at your DNS provider.
- Wait a few minutes, then refresh the domain status in the Site’s settings.
If browsing or computer use is enabled, ChatGPT can go through your DNS provider’s dashboard for you once you’ve signed in there.
If the domain stays pending and returns a 404, compare your DNS records with the ones in the Site’s settings, the verification TXT record included.
From January 2027 a custom domain uses 25 credits a month. Custom domains aren’t available in Enterprise workspaces yet.
See who visits
Sites records traffic automatically, with no analytics script to add. Open the Sites list, find the Site, and select More actions > Analytics. You get unique visitors and page views, as totals and over time, with a date range and a granularity you can change.
Analytics isn’t available for Sites owned by an Enterprise workspace.
Update a Site on a schedule
A Site can have scheduled tasks that update its data while nobody has it open, like refreshing a dashboard every morning. Open the Site’s Automations, select Create schedule, then review the instructions and the timing. ChatGPT can also offer one with Set up scheduled task while you work on the Site.
Schedules run in the cloud, and you must own both the Site and the schedule. A scheduled task can’t use the app access a visitor approved on the Site, so it needs its own way to reach the data.
What runs under the hood
Everything so far works without looking at the code. If you’re a developer, it helps to know what Sites is shipping, because that tells you what you can ask for and what won’t work.
The Sites plugin
In Codex, the Sites plugin provides instructions for building and publishing a Site, plus a connector that exposes the hosting API. It has two skills: sites covers building and hosting, and sites-remix covers starting from an existing Site.
The connector’s tools create Sites, save and deploy versions, check deployment status, change access, set environment variables, manage custom domains and create schedules. They can also read the Site’s recent Worker logs and look inside its database.
The logs are useful when something breaks after a deploy:
Check the last hour of errors in this Site's logs and fix the cause.My Codex guide explains how plugins and skills work in general.
The runtime is a Cloudflare Worker
Hosted Sites run on Cloudflare Workers, with D1 and R2 for storage. The plugin’s instructions say so, the starter builds a Worker, and the private Site we requested earlier answered with server: cloudflare.
The hosted Sites environment has these limits:
- Each isolate gets 128 MB of memory, shared by the requests it handles.
- HTTP, HTTPS and WebSockets work. Raw TCP connections don’t, so a Postgres or MySQL driver that opens a socket can’t connect. Use services with an HTTP API instead.
- The server code has to be a Worker-compatible ES module.
If you’ve never written a Worker, start with Cloudflare Workers: your first serverless function. The free Cloudflare course goes further, from Workers to D1 and R2.
What changes compared to deploying on Cloudflare yourself is who owns the account. The Workers, databases and buckets live in OpenAI’s account. There’s no Cloudflare dashboard and no Wrangler access to production, and D1 and R2 are the only storage Sites offers.
The starter project
What Codex starts from depends on what you ask for. A simple page, or one whose interactions all happen in the browser, is plain HTML and JavaScript with no build step. When the Site needs server code, Codex copies the plugin’s starter project, which uses:
- vinext, Cloudflare’s Vite plugin that reimplements the Next.js API, so the code looks like a Next.js App Router project
- React and Tailwind CSS
- a set of ready-made shadcn/ui components
- Drizzle ORM and Drizzle Kit for the D1 database
- a small helper file for Sign in with ChatGPT
These are the main versions in the package.json of the 1.1.6 starter:
| Package | Version |
|---|---|
vinext | 1.0.0-beta.5 |
next | 16.3.4 |
react | 19.2.6 |
tailwindcss | 4.2.1 |
drizzle-orm | 0.45.2 |
vite | 8.0.13 |
wrangler | 4.92.0 |
It needs Node.js 22.13 or later. The plugin has a second starter too, a single Worker file with no dependencies, which Codex uses only when you ask for a plain Worker.
The file that links a local folder to its Site is .openai/hosting.json. It holds the Site’s ID, once the Site exists, and the names of the storage bindings. Before the Site is created, the one for our meetup page looks like this:
{
  "d1": "DB",
  "r2": "BUCKET"
}
DB and BUCKET are the names the code uses to reach the database and the bucket, and null means the Site doesn’t use that kind of storage. Secrets never go in this file, so it’s safe to commit.
Other fields show up as the Site grows:
| Field | What it holds |
|---|---|
project_id | The Site’s ID, added when Sites creates the Site |
static | The folder to serve, for a Site with no server code |
capabilities | Extra features, like "mcp" for a Site that hosts an MCP server |
plugins, connectors | The connected apps the Site uses |
The code behind the meetup page
The following files make a complete RSVP and speaker-slides example on top of the starter. Keep the starter’s authentication helper, database helper, dependencies and build scripts, and replace or add the files at the paths shown.
The database schema lives in db/schema.ts, written with Drizzle. One table, with one row per person:
import { sql } from 'drizzle-orm'
import { sqliteTable, text } from 'drizzle-orm/sqlite-core'

export const rsvps = sqliteTable('rsvps', {
  userId: text('user_id').primaryKey(),
  name: text('name').notNull(),
  createdAt: text('created_at').notNull().default(sql`CURRENT_TIMESTAMP`),
})
The RSVP endpoint is a route handler in app/api/rsvp/route.ts. It gets the visitor from getChatGPTUser(), the starter’s helper that reads the identity headers we saw earlier:
import { getChatGPTUser } from '@/app/chatgpt-auth'
import { getDb } from '@/db'
import { rsvps } from '@/db/schema'

export async function POST(request: Request) {
  const user = await getChatGPTUser()
  if (!user) {
    return new Response('Sign in to RSVP', { status: 401 })
  }

  if (request.headers.get('origin') !== new URL(request.url).origin) {
    return new Response('Invalid origin', { status: 403 })
  }

  await getDb()
    .insert(rsvps)
    .values({ userId: user.userId, name: user.displayName })
    .onConflictDoNothing()

  return Response.redirect(new URL('/', request.url), 303)
}
The check happens on the server, so a signed-out visitor who calls the endpoint directly gets a 401. Since user_id is the primary key, onConflictDoNothing() makes a second click a no-op instead of a second RSVP.
Before the page, add SPEAKER_USER_IDS?: string to the existing Cloudflare.Env interface in cloudflare-env.d.ts. Keep its DB and BUCKET declarations.
Set a comma-separated list of allowed user IDs as the Site’s SPEAKER_USER_IDS environment variable. For local testing only, put SPEAKER_USER_IDS=local_seedy in the ignored .dev.vars file. An empty list grants nobody upload access. After signing in, a speaker can read their ID from the page and give it to the owner; a visitor cannot add themselves to the server’s list.
Save this helper as app/speakers.ts:
import { env } from 'cloudflare:workers'

export function speakerIds() {
  return (env.SPEAKER_USER_IDS ?? '')
    .split(',')
    .map(id => id.trim())
    .filter(Boolean)
}
The page is a React Server Component in app/page.tsx:
import { chatGPTSignInPath, getChatGPTUser } from '@/app/chatgpt-auth'
import { speakerIds } from '@/app/speakers'
import { getDb } from '@/db'
import { rsvps } from '@/db/schema'

export const dynamic = 'force-dynamic'

export default async function Home() {
  const user = await getChatGPTUser()
  const people = await getDb().select().from(rsvps)
  const speakers = speakerIds()
  return (
    <main>
      <h1>Frontend Friday</h1>
      <p>Going: {people.length}</p>
      {user ? (
        <>
          <form action="/api/rsvp" method="post">
            <button>Count me in, {user.displayName}</button>
          </form>
          <p>Your speaker ID: <code>{user.userId}</code></p>
          {speakers.includes(user.userId) && (
            <form action="/api/slides" method="post" encType="multipart/form-data">
              <label>Slides, PDF up to 5 MiB <input name="slides" type="file" accept="application/pdf" required /></label>
              <button>Upload or replace my slides</button>
            </form>
          )}
          <h2>Speaker slides</h2>
          {speakers.length ? (
            <ul>{speakers.map((id, index) => (
              <li key={id}><a href={`/api/slides?speaker=${encodeURIComponent(id)}`}>Download speaker {index + 1}'s slides</a></li>
            ))}</ul>
          ) : <p>No speakers configured yet.</p>}
          <p>A download returns “No slides uploaded yet” until that speaker uploads a file.</p>
        </>
      ) : (
        <a href={chatGPTSignInPath('/')} target="_top">Sign in with ChatGPT to RSVP</a>
      )}
    </main>
  )
}
dynamic = 'force-dynamic' renders the page on every request, because what it shows depends on who’s asking. The sign-in link uses target="_top" because sign-in has to be a full page navigation, never a fetch() or a client-side route change.
Save the upload and download handlers together as app/api/slides/route.ts:
import { env } from 'cloudflare:workers'
import { getChatGPTUser } from '@/app/chatgpt-auth'
import { speakerIds } from '@/app/speakers'

const maxPdfBytes = 5 * 1024 * 1024
const maxRequestBytes = maxPdfBytes + 64 * 1024

async function boundedForm(request: Request) {
  const reader = request.body?.getReader()
  if (!reader) throw new Response('Missing upload', { status: 400 })
  const chunks: Uint8Array[] = []
  let size = 0
  try {
    while (true) {
      const { done, value } = await reader.read()
      if (done) break
      size += value.byteLength
      if (size > maxRequestBytes) {
        await reader.cancel()
        throw new Response('Upload too large', { status: 413 })
      }
      chunks.push(value)
    }
  } finally {
    reader.releaseLock()
  }
  const bytes = new Uint8Array(size)
  let offset = 0
  for (const chunk of chunks) {
    bytes.set(chunk, offset)
    offset += chunk.byteLength
  }
  return new Response(bytes, { headers: request.headers }).formData()
}

export async function POST(request: Request) {
  const user = await getChatGPTUser()
  if (!user) return new Response('Sign in first', { status: 401 })
  if (!speakerIds().includes(user.userId)) {
    return new Response('Speakers only', { status: 403 })
  }
  if (request.headers.get('origin') !== new URL(request.url).origin) {
    return new Response('Invalid origin', { status: 403 })
  }
  if (!env.BUCKET) return new Response('Storage unavailable', { status: 503 })

  let form: FormData
  try {
    form = await boundedForm(request)
  } catch (error) {
    return error instanceof Response
      ? error
      : new Response('Invalid upload', { status: 400 })
  }
  const files = form.getAll('slides')
  const file = files[0]
  if (files.length !== 1 || !(file instanceof File) || file.type !== 'application/pdf') {
    return new Response('Choose one PDF', { status: 400 })
  }
  if (file.size === 0 || file.size > maxPdfBytes) {
    return new Response('PDF must be between 1 byte and 5 MiB', { status: 413 })
  }
  const bytes = await file.arrayBuffer()
  if (new TextDecoder().decode(bytes.slice(0, 5)) !== '%PDF-') {
    return new Response('Missing PDF header', { status: 400 })
  }
  await env.BUCKET.put(`slides/${encodeURIComponent(user.userId)}.pdf`, bytes, {
    httpMetadata: { contentType: 'application/pdf' },
  })
  return Response.redirect(new URL('/', request.url), 303)
}

export async function GET(request: Request) {
  if (!await getChatGPTUser()) return new Response('Sign in first', { status: 401 })
  if (!env.BUCKET) return new Response('Storage unavailable', { status: 503 })
  const id = new URL(request.url).searchParams.get('speaker')
  if (!id || !speakerIds().includes(id)) return new Response('Not found', { status: 404 })
  const object = await env.BUCKET.get(`slides/${encodeURIComponent(id)}.pdf`)
  if (!object) return new Response('No slides uploaded yet', { status: 404 })
  return new Response(object.body, {
    headers: {
      'Content-Type': 'application/pdf',
      'Content-Disposition': 'attachment; filename="slides.pdf"',
      'X-Content-Type-Options': 'nosniff',
      'Cache-Control': 'private, no-store',
    },
  })
}
The upload checks identity and the speaker list before reading the body. The reader caps the whole multipart request, so an oversized upload is rejected even without a trustworthy Content-Length. It then checks the file’s size, declared type and %PDF- header. These checks catch obvious wrong files; they are not a PDF parser or a malware scan. Only trusted speakers can upload, and downloads are attachments with nosniff.
Each speaker owns one object key. Uploading again replaces that speaker’s slides. Other signed-in visitors can download them, but cannot replace them. The GET handler returns 404 until a file exists and doesn’t cache a private download publicly.
Both write routes check Origin as well as identity. The starter’s identity helper trusts headers supplied by Sites’ authentication layer. Keep local preview bound to loopback; a separately deployed Worker needs its own authentication boundary before it can trust those headers.
I ran these cases against the local server. Run them again on your private deployment before sharing the Site:
| Action | Result |
|---|---|
| Signed-out RSVP or download | 401 |
| RSVP twice with the same account | Count increases once |
| Signed-in visitor outside the speaker list uploads | 403 |
| A request from another origin | 403 |
| Wrong file type or missing PDF header | 400 |
| File over 5 MiB, or request over the body limit | 413 |
| Download before that speaker uploads | 404 |
| Speaker uploads and downloads a PDF | Identical bytes; replacement stays under the same speaker’s key |
Run it locally
In a Codex project, you can run the Site on your computer like any Node.js project:
npm run devThe dev server starts on port 5173 and simulates the D1 and R2 bindings. It also simulates Sign in with ChatGPT: open /signin-with-chatgpt?return_to=/ and you’re signed in as a test user named Seedy, with the ID local_seedy and the email seedy@sites.test. Production builds don’t include this fake sign-in.
Port 5173 was busy on my computer, so I started it with npm run dev -- --port 4391. This is the page after signing in as Seedy, with local_seedy in the speaker list:
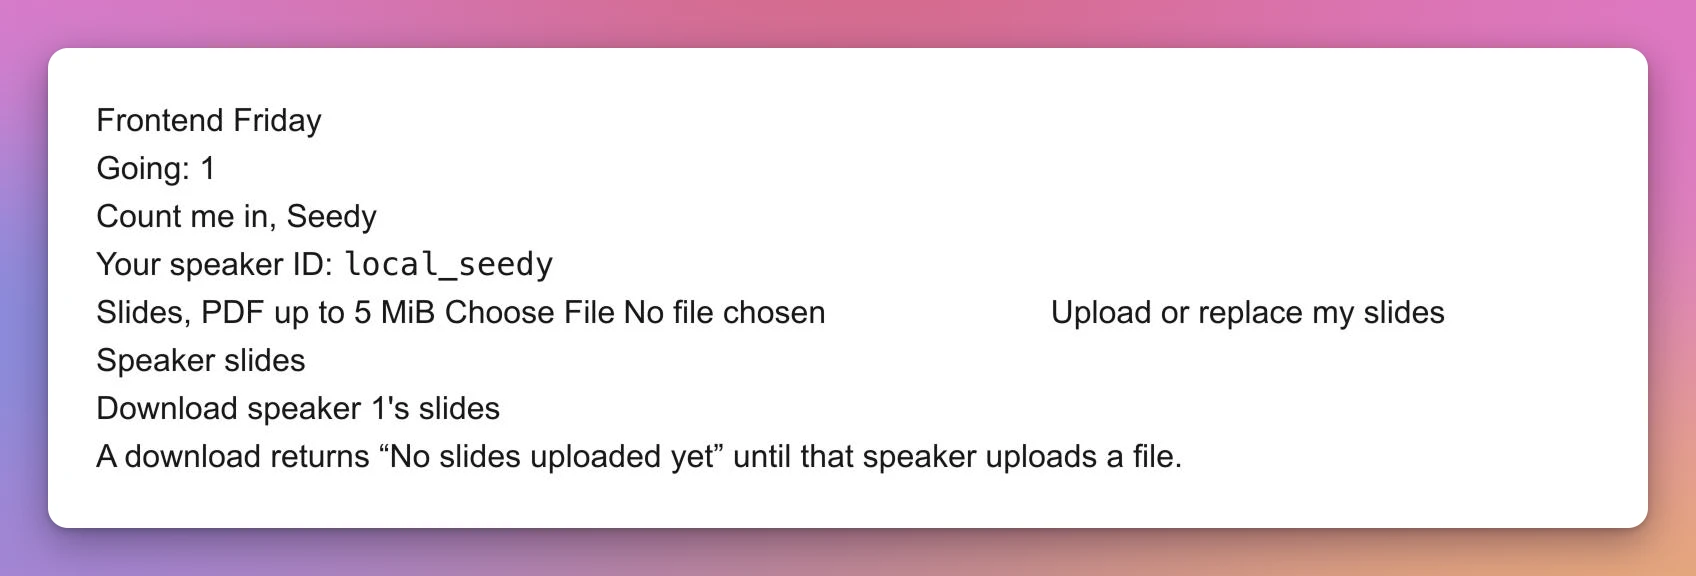
It looks bare because the example has no styling, only the markup from app/page.tsx.
Without signing in, the RSVP endpoint rejects the request:
curl -i -X POST -H 'Origin: http://localhost:4391' http://localhost:4391/api/rsvpHTTP/1.1 401 Unauthorized
content-type: text/plain;charset=UTF-8
Sign in to RSVPThe local sign-in is a stand-in for the hosted one, so repeat the signed-out and signed-in checks on the private deployment.
When the schema changes, generate a migration:
npm run db:generateDrizzle Kit writes a SQL file in the drizzle/ folder. For our table it contains:
CREATE TABLE `rsvps` (
  `user_id` text PRIMARY KEY NOT NULL,
  `name` text NOT NULL,
  `created_at` text DEFAULT CURRENT_TIMESTAMP NOT NULL
);
Build once with npm run build to generate dist/server/wrangler.json. Then apply the generated SQL locally, substituting the actual filename printed by Drizzle:
node --import ./scripts/sites-env.mjs ./node_modules/wrangler/bin/wrangler.js d1 execute DB --local --config dist/server/wrangler.json --persist-to .wrangler/state --file drizzle/0000_funny_joseph.sqlRun each migration once in order. Sites applies production migrations separately when it deploys. The local database is separate. My post on running D1 locally explains how that local database works.
Treat a migration as permanent once it has run. Migrations run before the new Worker is uploaded, so a failed deploy can still leave some of them applied. To change the schema, add a new migration instead of editing an old one.
How publishing works
When Codex publishes a Site, it goes through these steps:
- Build the project. The output is a Worker in
dist/server/index.js, static files indist/client, and a copy ofhosting.jsonand the migrations indist/.openai. - Commit the source and push it to a Git repository that Sites keeps for that Site.
- Package the build into an archive.
- Save a version from that commit and archive, then deploy it.
- Check the deployment status until it succeeds or fails.
Since the source lives in that repository, you can open an existing Site in a new Codex chat, and Codex clones its code into a local folder before editing it.
Deploy a project you already have
You can also publish a project you already have. In Codex, from your project’s folder:
Deploy this project with Sites. Check whether it is compatible, make any
required changes, and give me the deployment URL.
Static sites are the easy case. A framework that builds to a folder of HTML, CSS and JavaScript, like a static Astro or Vite build, only needs that folder set in hosting.json:
{
  "static": { "directory": "dist" },
  "d1": null,
  "r2": null
}
The folder can be dist, dist/client, out, build or .output/public. A static Site can’t use D1, R2 or migrations.
An app with server code needs a build that produces a Cloudflare Worker: an ES module at dist/server/index.js whose default export has a fetch handler. For Next.js, that means building it for Workers, for example with the OpenNext Cloudflare adapter. An Express server that listens on a port won’t run as it is.
Make your Site usable by AI agents
You can add WebMCP tools when browser agents need to perform the Site’s actions, such as submitting an RSVP. This is optional in the current Sites workflow; get the visible interface working first.
WebMCP is a proposed web standard that lets a page offer actions to AI agents as tools. When ChatGPT or Codex opens your Site in the desktop app’s built-in browser, it can call those tools instead of clicking around the page. My deep dive into WebMCP covers the standard in detail.
For our meetup page, an RSVP tool could look like this:
if (typeof document.modelContext?.registerTool === 'function') {
  await document.modelContext.registerTool({
    name: 'rsvp_to_meetup',
    description: 'RSVP the signed-in visitor to Frontend Friday.',
    inputSchema: {
      type: 'object',
      properties: {},
      additionalProperties: false,
    },
    annotations: { readOnlyHint: false },
    execute: async () => {
      const response = await fetch('/api/rsvp', { method: 'POST' })
      return { going: response.ok }
    },
  })
}
The tool calls the same endpoint as the button, so it goes through the same sign-in check. Add this registration to client-side code after the page loads. In an app with client-side navigation, register it once and clean it up when the component unmounts.
The small example returns the HTTP success status. A finished interface should also refresh the count and confirm the saved RSVP before reporting success. To test the tool, ask the agent to call it. Clicking the button only tests the button.
Site tools only run in the built-in browser of the ChatGPT desktop app. It finds tools registered from JavaScript and tools declared with WebMCP attributes on an HTML form, in the top-level page and in iframes. Select Site tools in the browser’s address bar to see what a page offers.
Host an MCP server on the Site
WebMCP tools exist only while the page is open. For tools that work from any ChatGPT or Codex chat, a Site can host an MCP server.
Ask ChatGPT or Codex to add an MCP server to the Site, and say what its tools should read and whether they can make changes. The Site gets "mcp" in the capabilities of .openai/hosting.json and a POST /mcp endpoint. When the owner publishes it, Sites creates a private plugin for that Site, and refreshes the plugin’s tool list on every publish.
Sites checks that the caller can view the Site before it forwards a request to /mcp, and adds the same identity headers a signed-in visitor has.
What you can’t do with Sites
Some limits come from the runtime, others from OpenAI’s policies.
A Site supports HTTP, HTTPS and WebSockets, but not raw TCP, inbound or outbound. An Enterprise workspace can connect a Site to a service on its private network through a tunnel, where the IT team runs OpenAI’s tunnel client. A tunnel reaches that one service, not the whole network. Long-running background processes and databases other than D1 still need another hosting setup.
In a workspace with US or EU data residency, new Sites use the workspace’s region for hosting and storage. Existing Sites aren’t migrated, other regions aren’t covered, and this is separate from where the model runs. There’s no region picker for a single Site. The workspace guide has the details.
You can’t use Sites to process health records (Protected Health Information) or payment card data, to target children under 13, to distribute malware, for phishing, or to impersonate people or organizations.
The current Sites documentation allows selling through a third-party payment processor. Card data must stay with that processor. You remain responsible for the integration, fulfillment, refunds and taxes. Other financial transactions remain prohibited; read the ChatGPT Sites terms for the precise conditions.
Your server code can call HTTP APIs, but reaching into connected apps, like an issue tracker or Google Drive, is a workspace feature. The Site has to be private to the workspace, the admins have to allow it, and each visitor signs in and chooses which of their own accounts the Site can use. A shared dashboard then shows each person their own data, with their own permissions.
On Plus and Pro, the chats where you create and edit a Site can be used to train OpenAI’s models if Improve the model for everyone is on in your data controls. On Business, Enterprise and Edu, they aren’t used for training by default.
Deleting a Site is permanent. Open the Sites list, select Delete site, type the Site’s slug and select Permanently delete. If you only want to take it offline, restrict its access to yourself instead.
OpenAI can also remove a Site that breaks its policies, and your organization can restrict access to Sites in its workspace.
Sites compared to other options
Vibe coding tools like v0, Lovable or Replit have the same idea: you describe an app, and it gets built and hosted. Sites is part of ChatGPT, so if you already pay for Plus or higher there’s nothing new to sign up for, and Sign in with ChatGPT and workspace sharing come built in. The trade-off is that a Site can only be hosted by OpenAI. I compared the different kinds of AI coding tools in IDE, CLI, vibe coding tool, how to decide?, and my v0 tutorial shows the Vercel take on this workflow.
Deploying on Cloudflare yourself gives you the same runtime, a Worker with D1 and R2. What changes is who owns it:
| ChatGPT Sites | Your own Cloudflare account | |
|---|---|---|
| Who owns the Worker, the database and the bucket | OpenAI | You |
| How you deploy | Ask ChatGPT or Codex | wrangler deploy, or a Git push |
| Storage | D1 and R2 | D1, R2, KV, Durable Objects, Queues and every other binding |
| Review before production | Save a version, with no URL to open | A preview URL for each version |
| Logs | Ask ChatGPT to read them | The dashboard and Wrangler |
| Sign-in | Sign in with ChatGPT, built in | You add your own |
| Sharing with specific people | The Share dialog | Cloudflare Access, or your own code |
| Moving somewhere else | Ask Codex to export the source | It’s already your repository |
With Sites, you give up the right column in exchange for setting up nothing. My guide on where to host your web app covers the other options.
How I use ChatGPT Sites
I tried Sites on launch day, July 9, 2026. In Codex, I wrote @Sites Create a website that can be used as a job board for a small startup. It proposed three visual directions, called Warm Editorial, Swiss Calm and Bold Studio, and I picked Bold Studio. Newer versions of the plugin skip that step unless you ask to compare designs.
The page came out well, but publishing failed twice, because Sites didn’t return the details Codex needed to upload the build. The Site itself had been created anyway, under the name Clover Careers. I referenced it in a new chat and wrote “deploy this site”. That chat couldn’t find the build from the first one, so it rebuilt the page from the Site’s title and description, then published it privately. It was day one of a beta, and it showed me that the Site, the chat and the local folder are three separate things.
The more useful case came on August 1. I was working on hostingpicker.dev and asked Codex to compare hosting a SaaS on Cloudflare, Vercel and Railway, for a made-up app with 1,000 paying users. I asked for a visualization, and Codex drew an interactive cost chart inside the chat. When I wrote “continue”, it moved to the Sites skills on its own, built a comparison page reusing the existing HostingPicker design, and published it privately. I didn’t set up any hosting or ask for a deploy.
That prototype didn’t stay on Sites. Two days later I started hostingpicker.dev over as an Astro project. That site is retired now, and the tool lives on as my hosting picker post. For DisasterLab, in July, I told Codex to use Astro on Cloudflare Pages, and to make that the default for all my sites.
So this is where Sites fits for me:
- turning an analysis or a chart into a page I can send to a couple of people
- throwaway prototypes, to see if an idea holds up before I build it properly
- small internal tools for a team that already works in ChatGPT, where Sign in with ChatGPT and workspace sharing take care of logins
I wouldn’t use it for something I want to own for years. My sites run on my own Cloudflare account, with my own domains and deploy setup, and I can move them whenever I want. A Site depends on a beta, on shared usage limits, and on hosting I can only manage through ChatGPT.
I’d like a preview URL for each saved version, the way Cloudflare Worker Previews give me one. Every deployment changes the production Site, so I ask to save a version without deploying when I want to review it first. The version-management guide explains that separation. Check which version is deployed afterward, especially if other editors can publish too.
Want me to talk about your product? You can sponsor this site.
Related posts about ai: