How to access files outside a Docker container
By Flavio Copes
Learn how to access and persist files outside a Docker container using bind mounts and volumes with the docker run -v flag, so your data is not lost.
If containers are isolated, how can they communicate to the host machine, perhaps to store data? Because when we create a container from an image, any data generated is lost when the container is removed.
So we need a way to have permanent storage.
We can do so using Bind Mounts and Volumes.
Both put a folder from outside the container at a path inside it. The difference is who owns that folder. A bind mount points to any folder you pick on the host computer, and Docker doesn’t manage it. A volume is storage Docker creates and manages for you.
Let’s start with bind mounts. One classic example is logs. Suppose your app creates a log file, inside the container, in /usr/src/app/logs. You can map that to a folder on the host machine, using the -v (same as --volume) flag when you run the container with docker run, like this: -v ~/logs:/usr/src/app/logs
This will map that folder to the logs subfolder in the user’s home directory.
This is the flag used with the examplenode image we created in the Node.js Hello World container tutorial:
docker run -d -p 80:3000 -v ~/logs:/usr/src/app/logs --name node-app examplenodeNote: you can write the same bind mount with the
--mountflag. It has no short form (-mis the memory limit flag). Docker prefers--mountbecause it’s more explicit and supports every option.
docker run -d -p 80:3000 --mount type=bind,src="$HOME"/logs,dst=/usr/src/app/logs --name node-app examplenodeThere’s one practical difference. If ~/logs doesn’t exist yet, -v creates the folder for you. --mount stops with an error instead, unless you add the bind-create-src option.
So now we can run our Node app, and any log will be stored in the host computer, rather than inside the Docker container.
Note that the
examplenodeapp does not generate any log in/usr/src/app/logs, it’s just an example and you would need to set that logging up first.
The details about the volume will be listed when you run docker inspect on the container name, under “Mounts”:
"Mounts": [
    {
        "Type": "bind",
        "Source": "/Users/flavio/logs",
        "Destination": "/usr/src/app/logs",
        "Mode": "",
        "RW": true,
        "Propagation": "rprivate"
    }
],
Can you see "Type": "bind"? That means that we have created a bind mount.
Now, let’s talk about Volumes.
The difference between Bind Mounts and Volumes is that by creating volumes, Docker will store the data in a folder it manages, which means it will take care of file permissions and ownership, and it will give you the tools to manage those volumes. While bind mounts are based on filesystem paths, and Docker can’t provide the tooling around them.
For example, Docker lets you clean up unused volumes with docker volume prune or docker system prune --volumes. By default both only remove unused anonymous volumes, the ones Docker creates without a name. Your named volumes stay put. To also remove unused named volumes, add --all:
docker volume prune --allTo create a volume, we first need to run docker volume create:
docker volume create logsNow you can use docker volume ls and docker volume inspect to get more data about the system volumes:
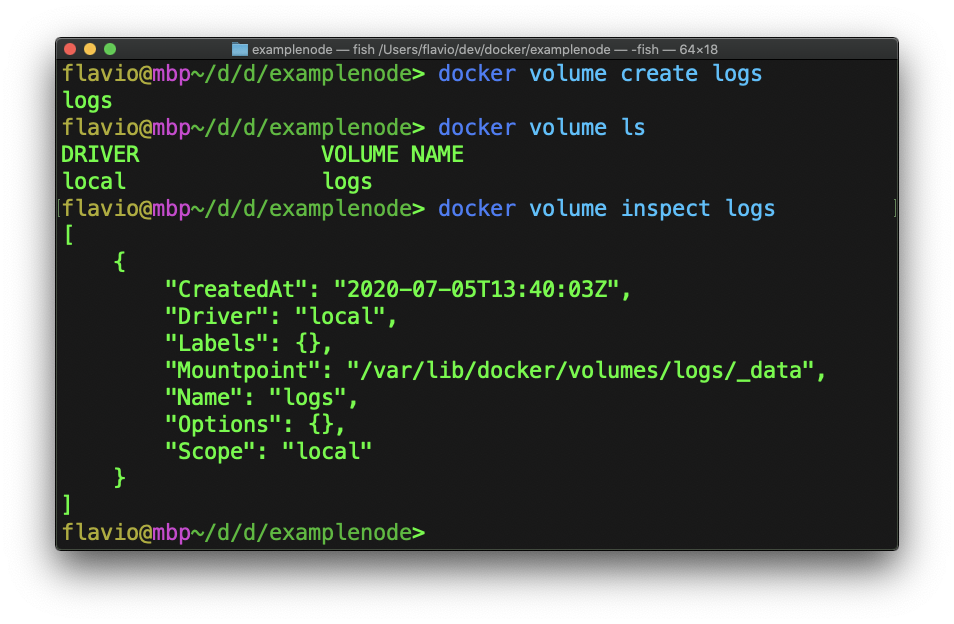
Now run docker run with the option -v logs:/usr/src/app/logs (tell the volume name instead of a folder)
docker run -d -p 80:3000 -v logs:/usr/src/app/logs --name node-app examplenodeNow running docker inspect on the container will show the mounted volume:
"Mounts": [
    {
        "Type": "volume",
        "Name": "logs",
        "Source": "/var/lib/docker/volumes/logs/_data",
        "Destination": "/usr/src/app/logs",
        "Driver": "local",
        "Mode": "z",
        "RW": true,
        "Propagation": ""
    }
],
See? Now the logs will be stored in the /var/lib/docker/volumes/logs/_data folder.
If you use Docker Desktop on a Mac or on Windows, don’t look for that folder on your computer. The Docker daemon runs inside a Linux virtual machine, and the folder lives in there.
Volumes will be essential when it will be time to deploy a container on a cloud service, for example. They also work in a Docker Compose file, where you declare the volume once and every service can use it.
You can remove a volume running docker volume rm <name>.
Bind mount or volume, which one?
Here’s how I’d pick.
Use a bind mount when you want to see and edit the files on your computer. Source code during development is the classic case. You edit a file in your editor and the app inside the container sees the change right away. Same for a config file you keep in your project folder, or output you want to open on the host, like logs or a build folder.
Use a volume for data the app owns, like a database. You don’t need to open those files yourself, you just need them to survive when the container is removed or replaced. Volumes work the same on every machine because they don’t depend on a folder existing on the host, so they’re what you want in production too.
A bind mount ties the container to your computer’s folder structure. Run the same command on a server without ~/logs and you get a different result. A volume doesn’t have that problem.
Read-only mounts
By default a container can write to a mount. With a bind mount, that means a process inside the container can change or delete files on your computer.
When the container only needs to read the files, mount them read-only. This is a good fit for config files and secrets.
With -v, add :ro at the end:
docker run -d -p 80:3000 -v ~/config:/usr/src/app/config:ro --name node-app examplenodeWith --mount, add readonly:
docker run -d -p 80:3000 --mount type=bind,src="$HOME"/config,dst=/usr/src/app/config,readonly --name node-app examplenodeNow docker inspect shows "RW": false for that mount, and any write from inside the container fails with a “Read-only file system” error.
The same option works for volumes too: -v logs:/usr/src/app/logs:ro.
Copy files in or out with docker cp
Sometimes you don’t want a permanent connection. You just need to grab a file from a container once, or drop a file in.
That’s what docker cp is for. It copies between a container and your computer, and the container can be running or stopped.
Copy the logs folder out of the node-app container into the current folder:
docker cp node-app:/usr/src/app/logs ./logsCopy a file from your computer into the container:
docker cp ./config.json node-app:/usr/src/app/config.jsonDirectories are copied recursively. Files you copy into the container are owned by root, and files you copy out are owned by your user. Add -a to keep the original user and group IDs instead.
Keep in mind that a file you copy into a container lives in that container only. When you remove the container, the file is gone. If you need it every time, use a mount or build it into the image.
Common gotchas
A name is a volume, a path is a bind mount. With -v, Docker looks at the first part to decide what you want. -v logs:/usr/src/app/logs creates (or reuses) a named volume called logs. -v ./logs:/usr/src/app/logs mounts the logs folder in the current directory. If you forget the ./ you get a volume, and you’ll wonder why your files never show up on your computer.
A mount hides what’s already in the image. If the image already has files at the path you mount over, a bind mount hides them. The container sees only what’s in your host folder. Mount an empty host folder over /usr/src/app and your app’s code disappears from the container’s point of view.
Volumes behave differently here. If you mount a new, empty volume on a folder that already has files in the image, Docker copies those files into the volume first. A bind mount never does that. A volume that already has data hides the image’s files, just like a bind mount.
File ownership on Linux. On a Linux host, a bind mount shows the files with the same numeric user and group IDs inside and outside the container. Many images run as root, so files the container creates in your bind mount end up owned by root on your computer, and you can’t edit or delete them without sudo. The other way around, if the container runs as a non-root user, it might not have permission to write to your folder.
One fix is to run the container as your own user:
docker run -d -p 80:3000 --user "$(id -u):$(id -g)" -v ~/logs:/usr/src/app/logs --name node-app examplenodeThe app needs to work as a non-root user for this, so it can’t, for example, listen on port 80 inside the container. Docker Desktop on macOS and Windows handles file sharing for you, so you’ll mostly hit this on Linux.
What about tmpfs mounts?
On Linux there’s a third option, a tmpfs mount. It keeps the files in memory, and they’re gone when the container stops. It’s the opposite of what this post is about, but it’s handy for temporary files you don’t want written to disk:
docker run -d -p 80:3000 --tmpfs /usr/src/app/tmp --name node-app examplenodeWant me to talk about your product? You can sponsor this site.
Related posts about docker: