
An app by Flavio
Desktop Interval Capture
Take a screenshot of one window, one display or an area every few seconds while you work, scrub through them on a timeline, and export a time-lapse video.
Buy Desktop Interval Capture · $19One-time purchase. Plus tax where it applies.
macOS 14 or later · Apple silicon and Intel
Latest version 1.0.1, released November 22, 2026
You spend three hours on an illustration, a redesign or a long spreadsheet. At the end you’d love a 40-second video that shows it taking shape.
A screen recording of those three hours is a huge file, and turning it into something short means opening it in a video editor and speeding it up. What you need is far less: one picture every few seconds, played back quickly.
Desktop Interval Capture takes a screenshot of one window, one display or an area you draw, every few seconds, while you work. When you stop, the frames are on a timeline you can scrub. Click Export Time-lapse… and you get an MP4.
Who it’s for
- Illustrators and painters. You draw for three hours in a painting app and want a short process video for Instagram. A frame every 10 seconds gives about 1,080 frames, 45 seconds of video at 24 frames per second, without a giant screen recording.
- UI designers. You capture only the design app’s window every 10 seconds during a redesign, and show the client how the layout evolved from the first boxes to the final screen.
- Teachers. You run a long live-coding or spreadsheet demo and capture it every 5 seconds. The class gets a short time-lapse with the time of each frame written on it.
- Developers and IT people. A long build or a data migration runs for hours. A frame of its window every minute lets you scrub back and see when the error first showed up.
- Writers and researchers. You keep a visual log of a long working day. The session pauses on its own while the screen is locked, so the breaks don’t fill the video.
From your work to a time-lapse
- Allow Screen Recording. macOS asks before any app can see the screen. The first time you open the app, it explains why and shows three steps. Click Open System Settings, turn on Desktop Interval Capture in Screen & System Audio Recording, and come back. If macOS asks, choose Quit & Reopen.
- Choose what to capture. Under What to capture, pick A window, A display or An area. The window list shows each window with its app icon, app name, title and size, the front-most one first. For an area, click Draw Area… and drag a rectangle over the screen. Esc cancels.
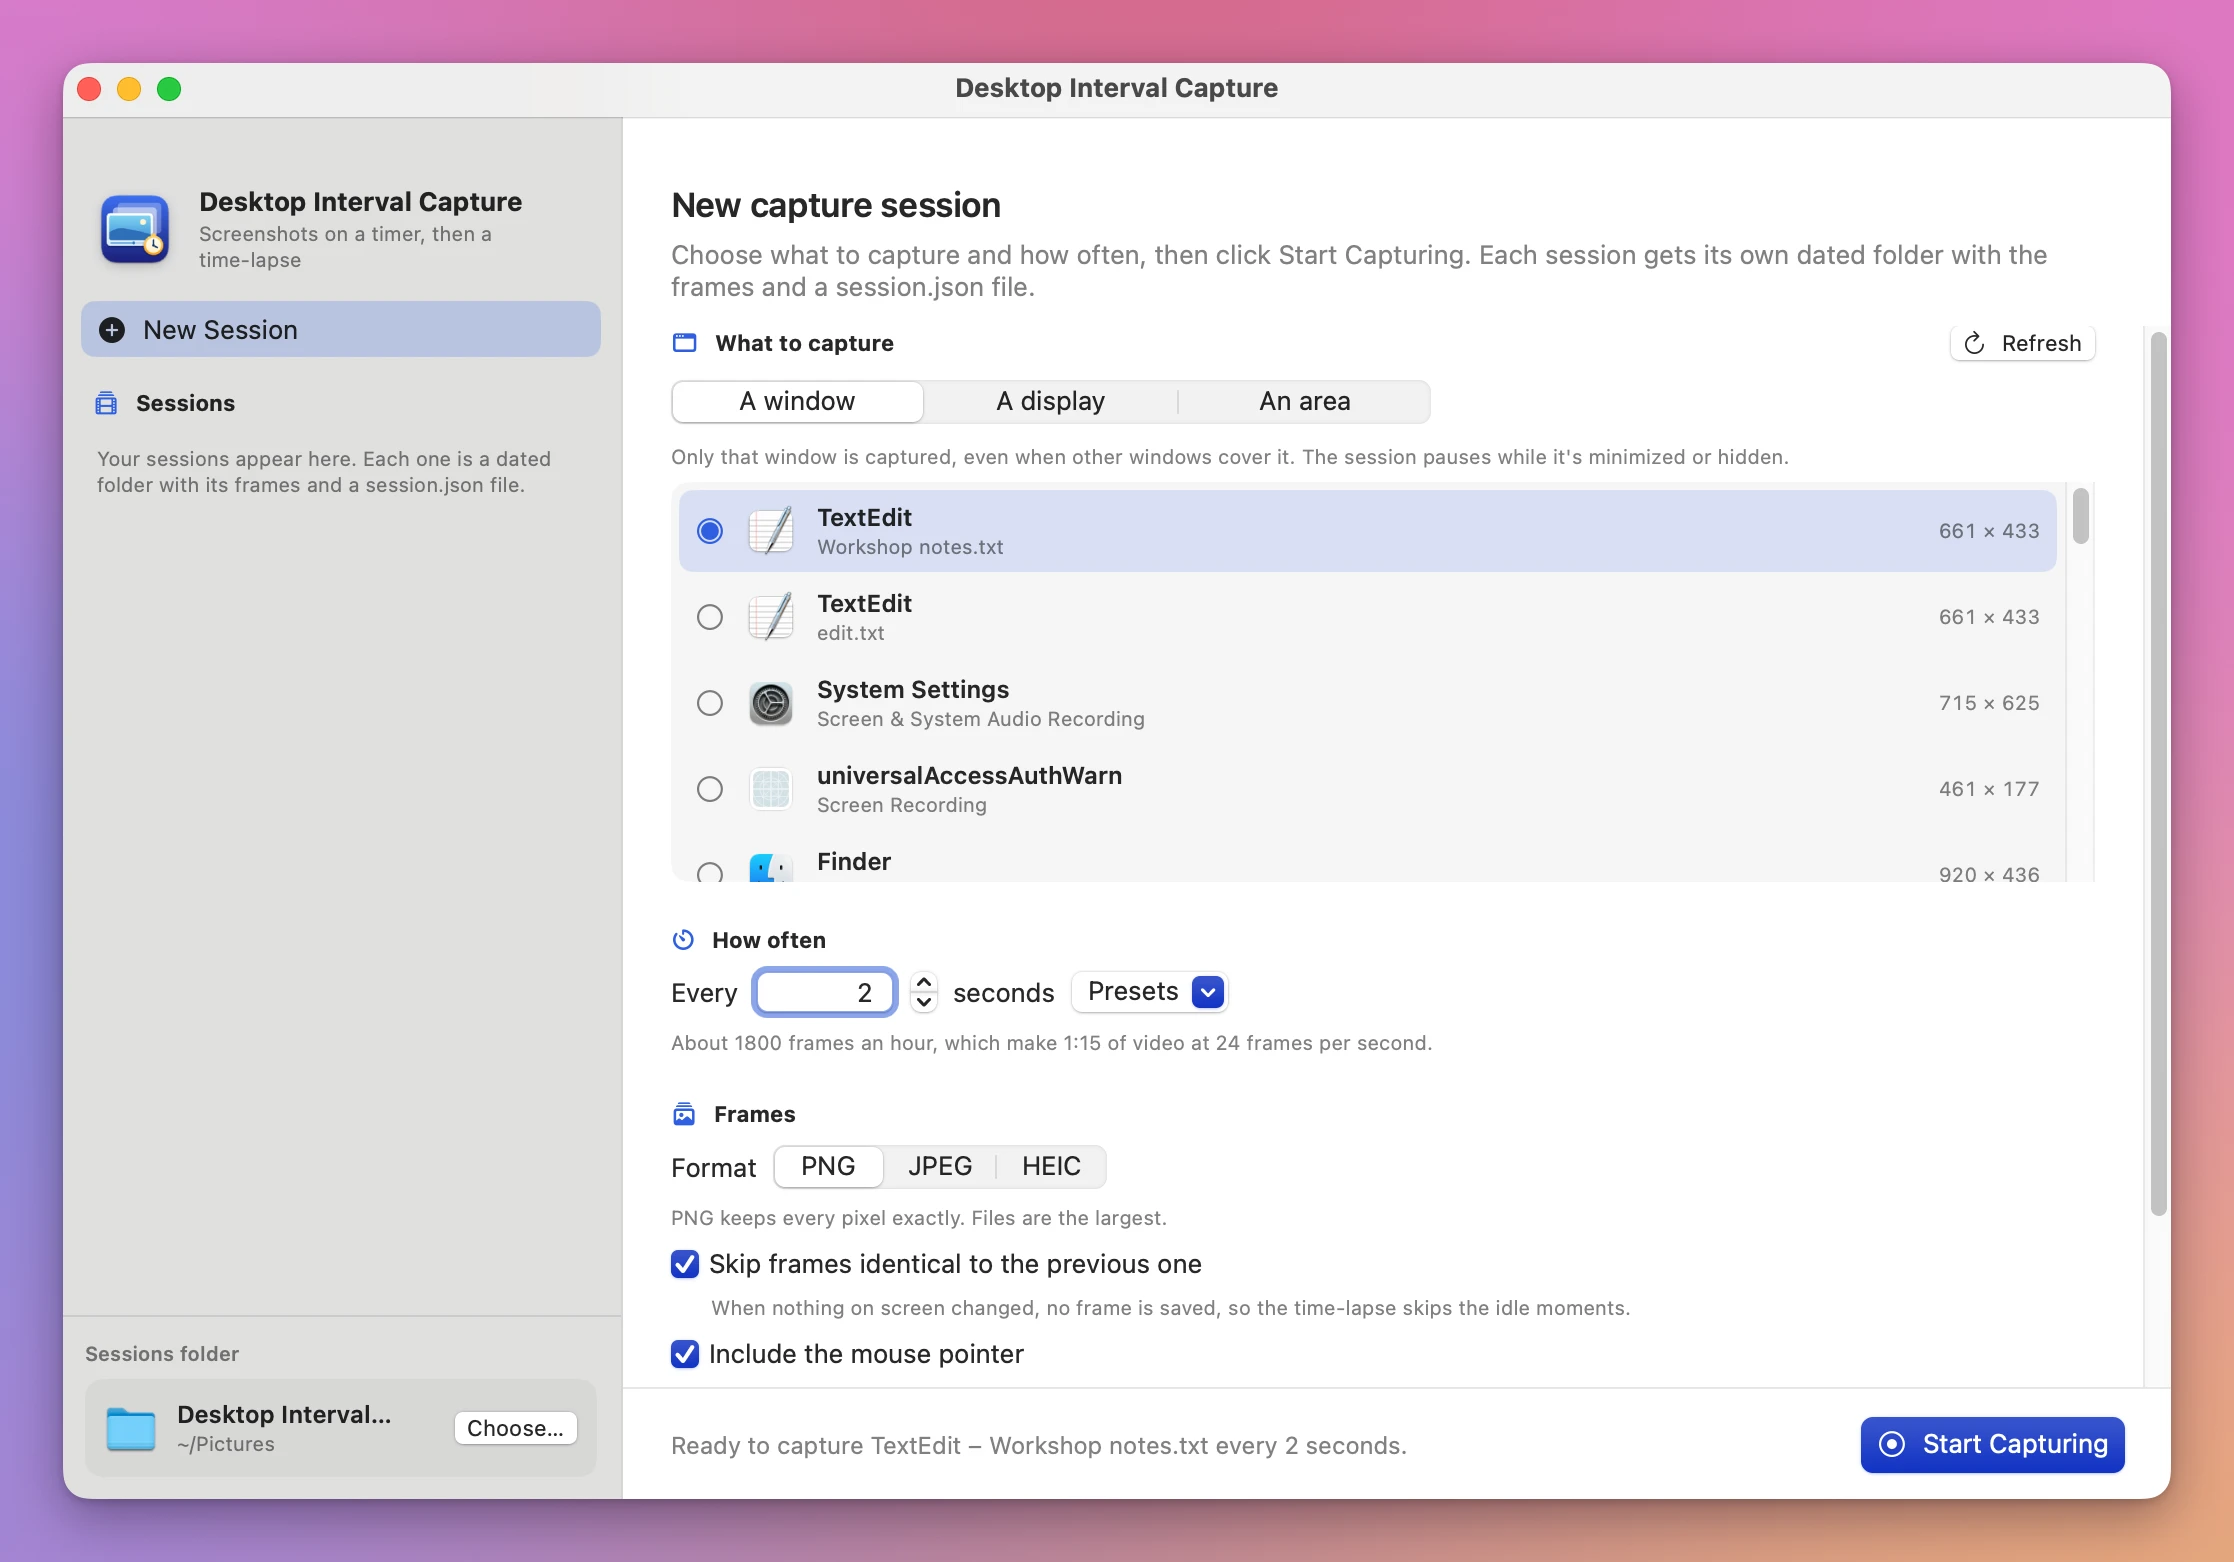
- Set how often. Type the seconds under How often, or pick one from Presets, from 1 second to 10 minutes. The line under it does the math for you: at 2 seconds it says “About 1800 frames an hour, which make 1:15 of video at 24 frames per second.”
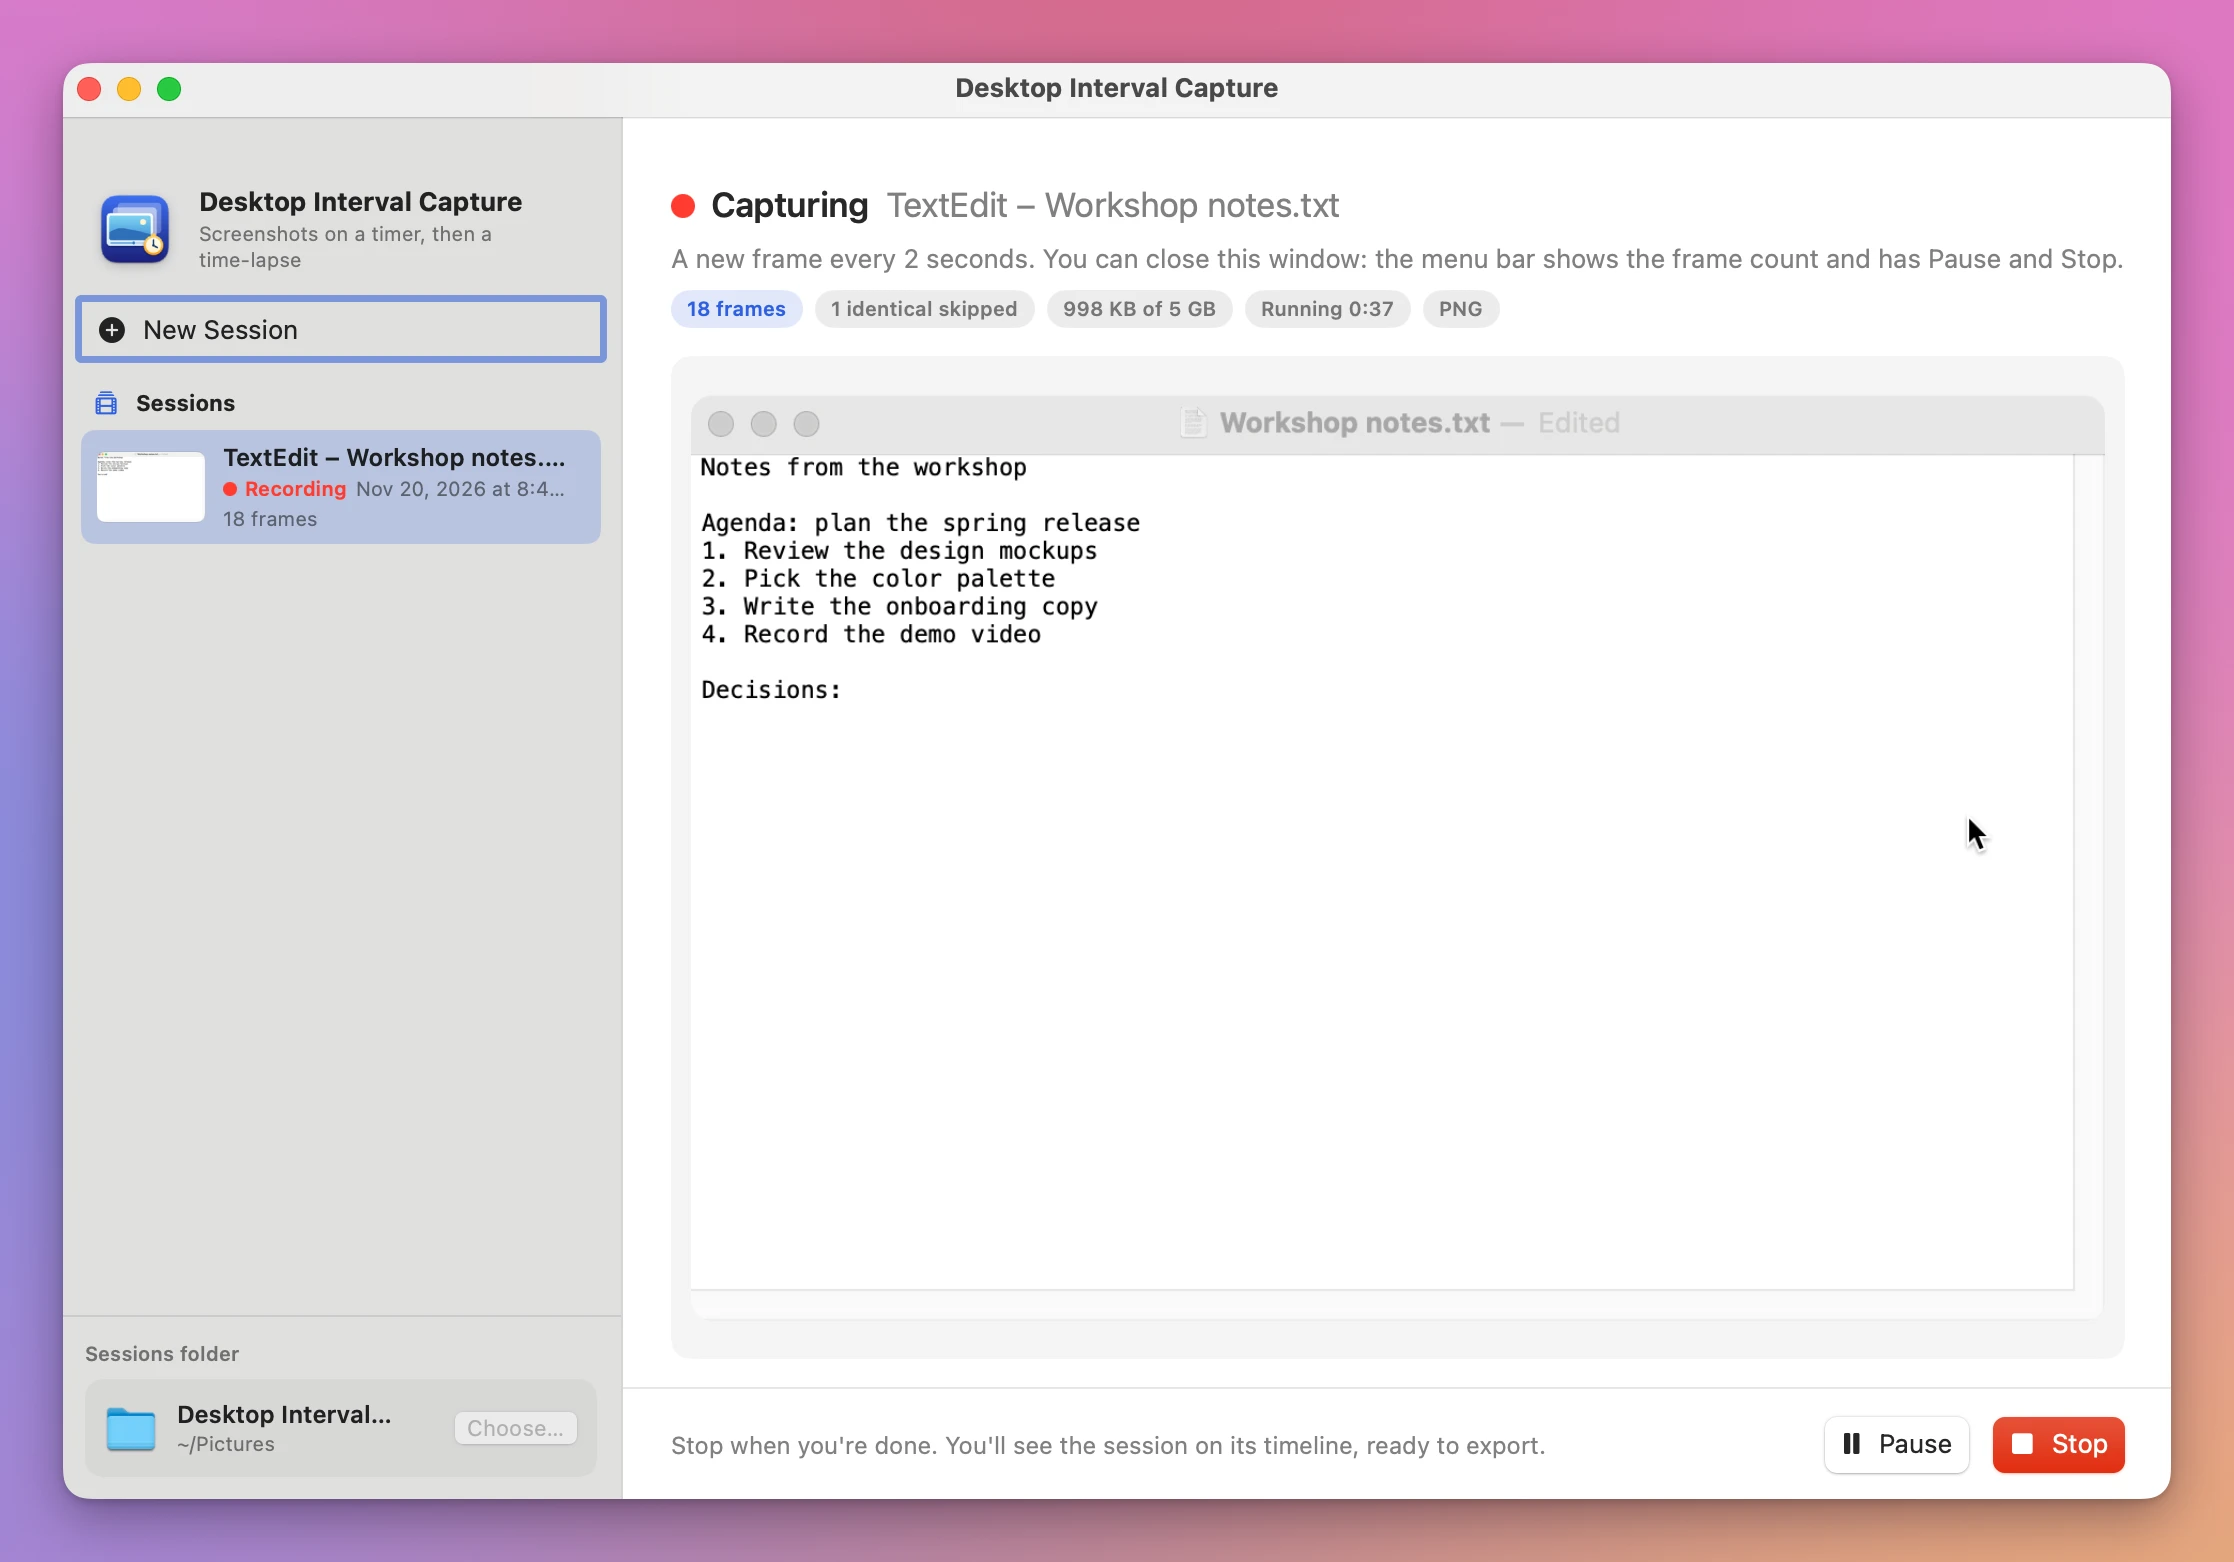
- Click Start Capturing (⌘R). The window shows the latest frame, the number of frames, the space used and how long it’s been running. You can close the window: the menu bar shows a record icon and the frame count, with Pause and Stop Session.
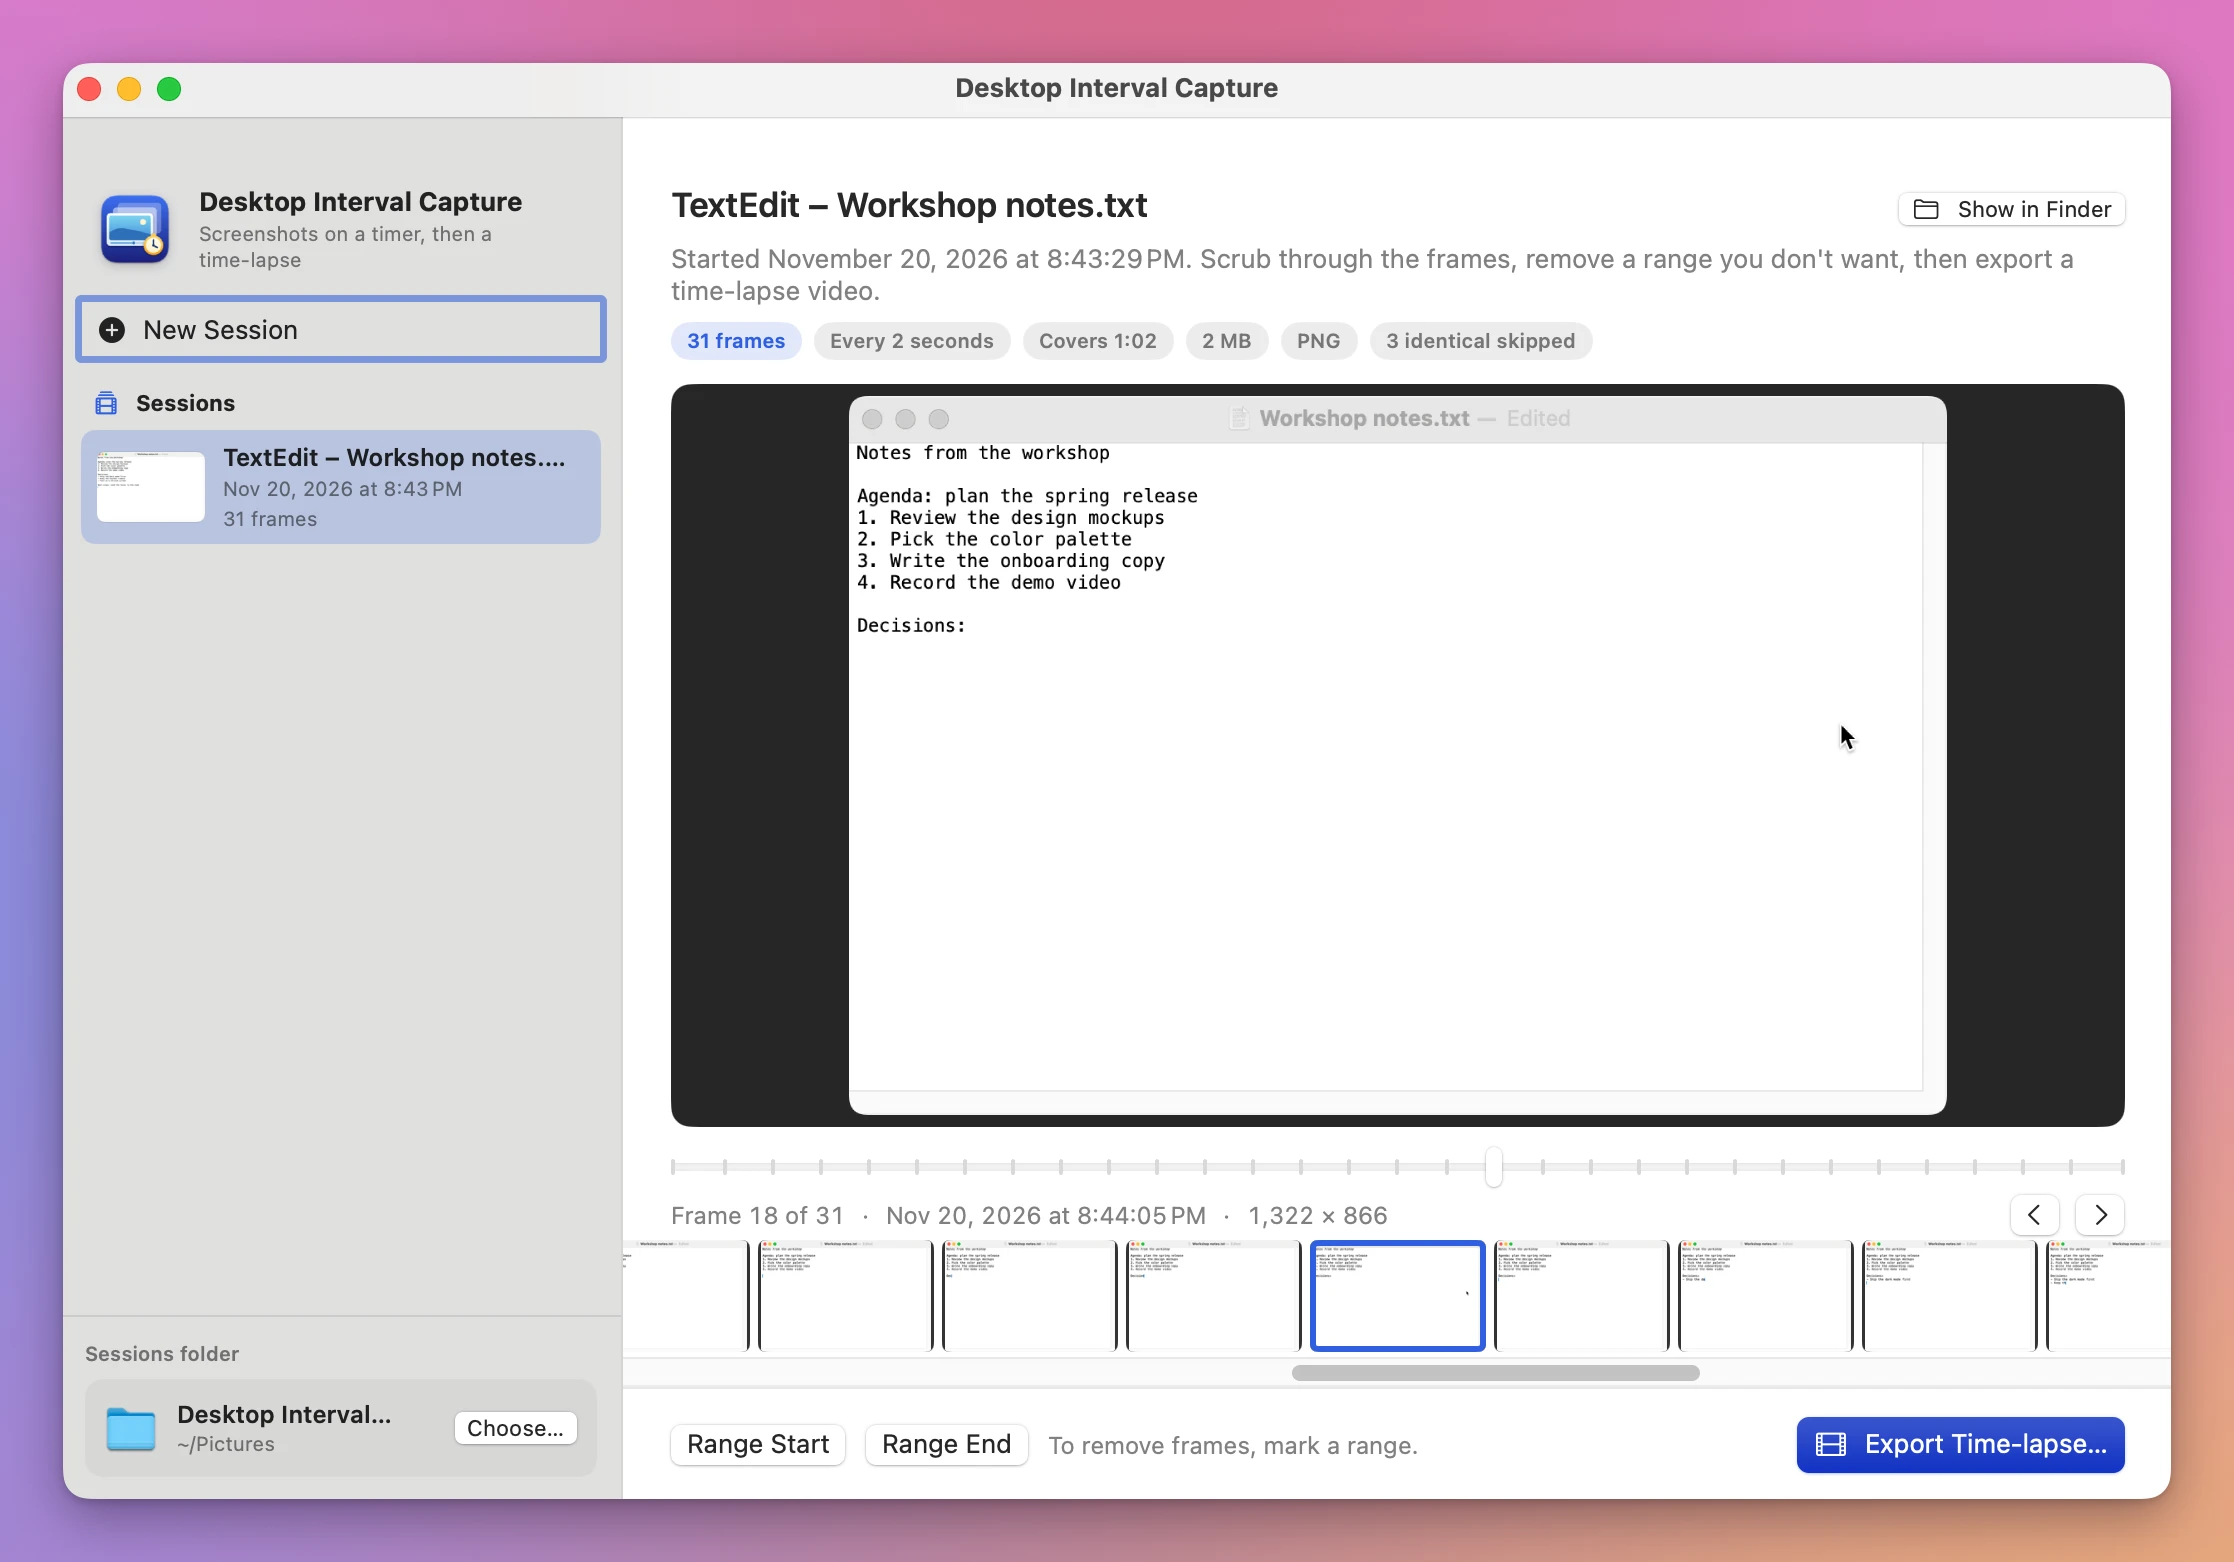
- Click Stop. The session opens on its timeline. Drag the slider or press ← and → to go through the frames. To cut a part you don’t want, click Range Start and Range End, then Delete N Frames….
- Click Export Time-lapse… (⌘E). Pick the codec, the frame rate and the size, type a file name, and click Export. The video lands in your Movies folder unless you pick another.
What you get
One window, even when it’s covered
Pick A window and only that window is captured, even when other windows cover it. You can keep your notes or a browser on top, and the time-lapse still shows only the painting app or the design file.
Pauses on its own
The session pauses while the screen is locked and while the Mac is asleep. For a window session, it also pauses while that window is minimized, hidden or on another desktop, and picks up again when it’s back. Each pause is written in the session’s log with its reason, so the time-lapse doesn’t fill up with a lock screen or a blank desktop.
Idle moments skipped
With Skip frames identical to the previous one ticked, a frame where nothing on screen changed isn’t saved. If you stop to think for five minutes, the video doesn’t stand still for five minutes.
A safe storage limit
Stop the session when its frames reach N GB sets a ceiling, 5 GB by default. The session also stops when the disk has less than 1 GB free, and every frame saved so far is kept.
Every session in its own folder
Each session is a dated folder in Pictures/Desktop Interval Capture, named after the date, the app and the window, like 2026-11-20 at 20.43.29 – TextEdit – Workshop notes.txt. Inside are the frames, frame-000001.png and on, in PNG, JPEG or HEIC, and a session.json file that records the settings, the time of every frame, the pauses and why the session stopped. Past sessions are listed in the sidebar, so you can come back and export again.
A time-lapse in the size you need
The Export Time-lapse sheet makes an MP4 in H.264 or HEVC (H.265), at 12, 24, 30 or 60 frames per second, in the original size or scaled down to 4K, 2560, 1080p, 720p or 720 pixels on the long side. Tick Show the time each frame was taken to write the time on every frame. A sentence tells you how long the video will be before you click Export, and a name that’s taken gets a number instead of replacing a file.
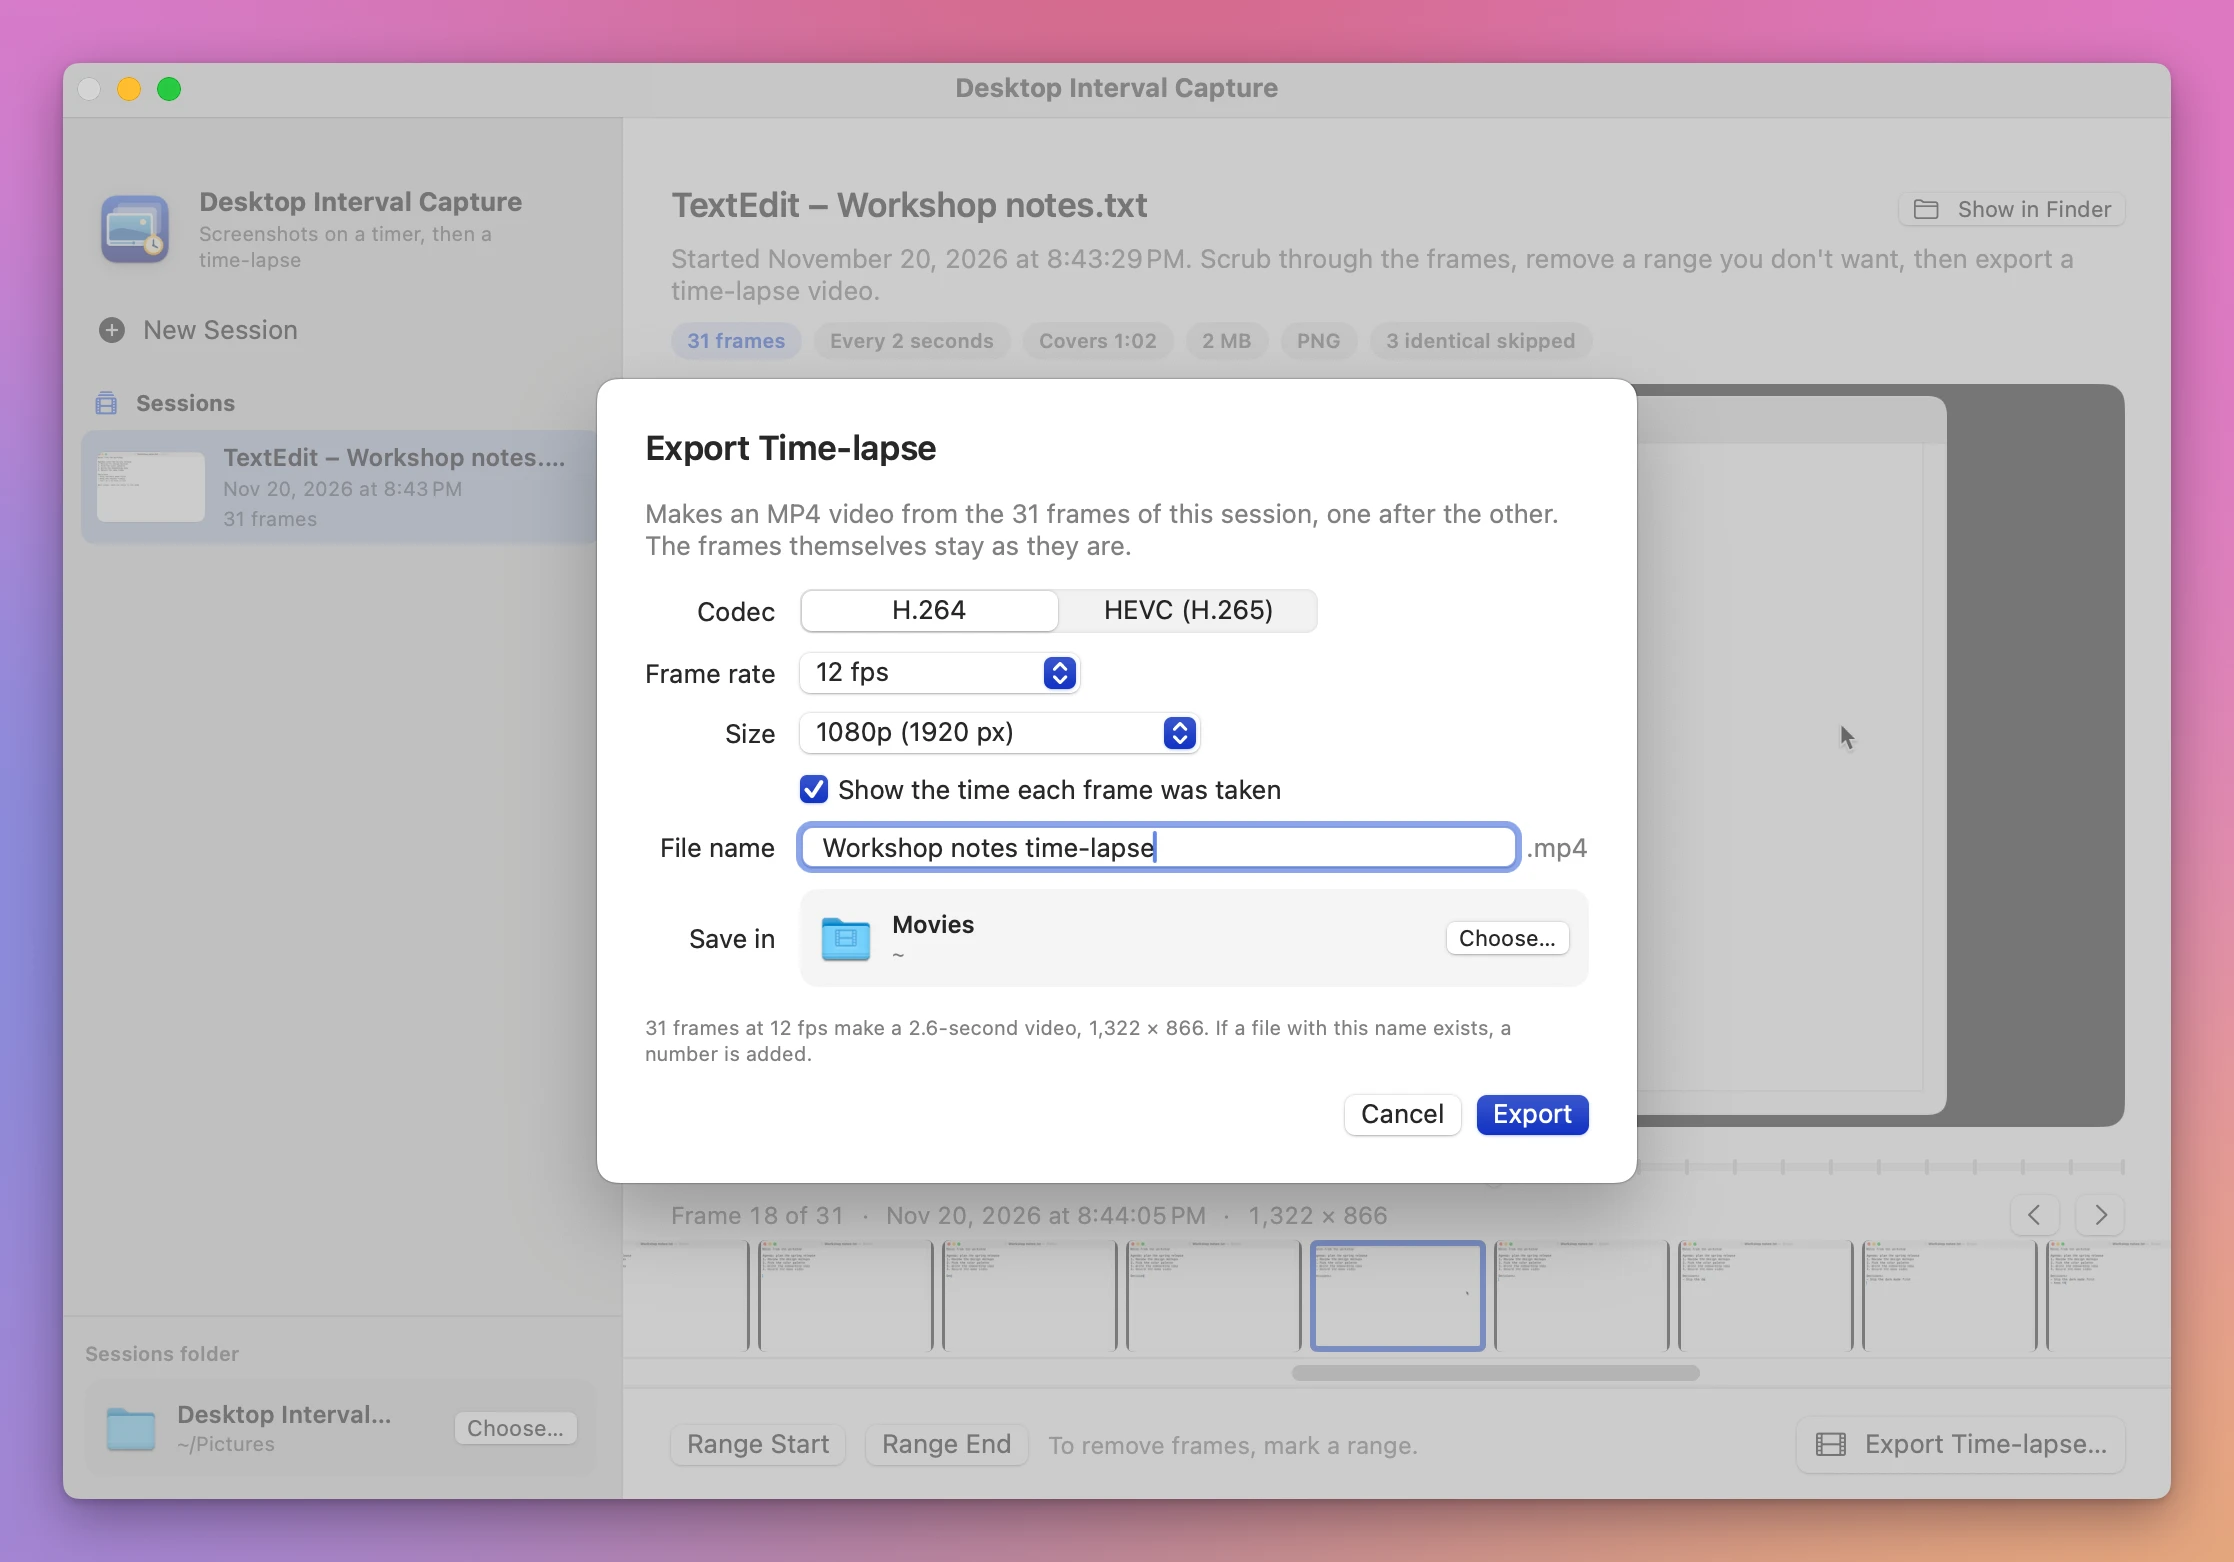
The frames are only read during the export, never changed. When it’s done, the app shows the file, the number of frames, the length, the size and the codec, with Show in Finder and Play.
Why not use the Mac’s screen recording
Shift-Command-5 and QuickTime Player record the screen as a video, in real time. For a three-minute demo that’s the right tool. For three hours of work, you get a three-hour file, nothing skips the moments where nothing moves, and making it short means opening it in a video editor and speeding it up.
Shift-Command-5 also takes single screenshots, by hand. Its timer only delays one screenshot by 5 or 10 seconds, so it can’t take one every 10 seconds for an afternoon.
With a script, the Mac’s screencapture command can take a screenshot every few seconds. You write and run the loop, it captures the whole screen or a fixed rectangle, and it keeps going when the screen is locked or the window is minimized. Then you need another tool, like ffmpeg, to turn the pictures into a video, with the right options for the frame rate, the size and the timestamps.
| Screen recording | A screenshot script | Desktop Interval Capture | |
|---|---|---|---|
| Three hours of work | A three-hour video | Thousands of screenshots | Frames every few seconds, as many as you choose |
| Only one window, even covered | No | Only if you look up its ID | Pick it from a list |
| Idle moments | Recorded | Recorded | Skipped when nothing changed |
| Screen locked or Mac asleep | Recorded | Keeps capturing | Pauses on its own |
| Look back through it | Scrub a long video | Open the images one by one | A timeline with a filmstrip |
| The video | Speed it up in an editor | Build it with another tool | Export Time-lapse…, with optional timestamps |
What it doesn’t do
- It doesn’t record video or sound. It takes still screenshots at the interval you set. For a demo with your voice, use Shift-Command-5 or QuickTime Player.
- It doesn’t edit the video. No titles, music or transitions. You get an MP4 of the frames in order, optionally with the time on each one.
- Export uses the whole session. There are no in and out points. To leave a part out, delete that range of frames on the timeline first (they go to the Trash).
- A window that closes ends the session. If the app you’re capturing quits and opens its window again, that’s a new window, and the session stops with a sentence that says so. Start a new session for the new window.
- Windows that change size give frames of different sizes. In the video, each one is fitted inside the first frame’s size, on black.
Questions
Does anything leave my Mac?
The frames are saved in a folder on your Mac and the video is made on your Mac. The app uses the internet only to check for updates.
Why does it need Screen Recording?
macOS doesn’t let any app see what’s on the screen without it. Desktop Interval Capture captures only the window, display or area you choose, and only while a session is running.
Can I close the window while it captures?
Yes. The session keeps running and the menu bar shows the frame count, with Pause, Stop Session and Show Desktop Interval Capture. Quitting the app while a session runs asks first.
Which frame format should I pick?
PNG keeps every pixel exactly and makes the largest files. JPEG files are much smaller and open everywhere. HEIC files are the smallest at the same quality. Both have a quality slider. For a time-lapse of text or a design, PNG keeps it sharp. For a long session where space matters, pick HEIC.
Can I use the frames somewhere else?
Yes. They’re ordinary image files in the session’s folder. Click Show in Finder on the timeline.
Is there a command line tool?
Yes, inside the app. It lists the windows and displays, captures, lists sessions and exports, for a script or a coding agent. The docs show how to use it.
What it needs
Desktop Interval Capture runs on macOS 14 Sonoma or later, on Apple silicon and Intel Macs. It needs the Screen Recording permission.
The Desktop Interval Capture docs walk through each setting.
Buy Desktop Interval Capture
$19 plus tax where it applies, paid once.
Download the app from the order page or your Creem receipt, unzip it and move it to Applications. I sign the app with my Apple Developer ID, and Apple notarizes the download.
The app checks for updates once a day. When a new version is ready, click Install and Relaunch. To check anytime, choose Desktop Interval Capture → Check for Updates….